Friday, March 30, 2012

Galley Flow

One of the things I've found to be most important in making your galley a workable place to produce nourishment for the crew is to be sure that the "flow" of the galley is natural.  What I mean by this is if you find that you are constantly reaching in the wrong place for something or if you have to move 20 things to get to something, then a change needs to be made so that the flow of your movements is more natural and, as a result, you become more productive and efficient, something that is extremely important in such a small space.

We spent this past winter working to improve the flow of my galley, adding little things here and there that have dramatically improved the experience for this particular galley chef.  A happy chef means a happy crew.

One of the things that was causing me some grief in my galley was the lack of proper lighting.  It was difficult to do dishes especially since there was no light over the sink.  I happen to be fortunate enough to have a really really deep sink in this boat, one big enough to do cookie sheets in, which is a real blessing.  But trying to do them in the dark meant re-doing them in the morning many times because of stuff I'd missed. We added an LED bar light over the sink so I can now see all the food stuck on the pans.  It made an unbelievable difference in the galley, making it seem nearly twice as big at night and offering some light to the salon as well.


Early in the winter we removed our totally useless nav seat and built a bench seat with an openable lid and storage inside with a cushion on top.  This provided the space I was missing for cookie sheets, pans, and a collapsible strainer, all of which used to reside inside the oven and had to be removed to the salon seat while I baked.


Over the last week we added a spice rack behind my refrigerator - a really big spice rack - which will empty my glasses rack and allow room for more glasses. It also puts my spices within easy reach instead of crammed at the back of a cabinet. It takes the place of 3 really hideously ugly placards that I hated having in my face all the time and which have since taken up residence on the front of the companionway stairs where they are a bit less obtrusive.

Sorry for the lousy picture - I never seem to get around to these posts till after dark...
A few months ago while perusing the ads for other Tartan 42s to see if they had any cool stuff in their pictures that we could adopt, we saw that we were missing a piece of counter that went over the stove and stored behind the stove when not in use.  A couple days' work, a few dollars of scrap corian countertop and some teak and we had that piece replaced, only better.  Now I have a place to knead bread and cut veggies without damaging our countertop.

Pulled over the stove
Stored behind the stove

There was the addition of the hinge for the fridge lid which you had to hold perilously while trying to get things from the bottom basket...


and fixing the small counter that comes up from the side of the sink so it sits level and doesn't let stuff slide on it.


And the last improvement that we did was to add an easily wiped off backsplash that would lighten up a dark corner behind the sink.

The total cost of these improvements was less than $200, and while they did cost a couple days' worth of work for each project, they will, in the end, save many more days of work in the galley, make spending time there more enjoyable, and also a good bit safer underway. So while you're working in your galley, use your imagination to see if you can dome up with some creative ways to improve the flow of your galley.  Your crew will thank you when you produce some freshly made loaves of bread and some coffee on a morning passage...even if it was them that had to do all the work on the projects!


Friday, March 16, 2012

Pizza Sandwiches

I'm not exactly sure how these got their name or who actually named them in our family, but these have been a staple of the family dinner menu for about as long as I can remember.  The page in the Red Star Yeast cookbook is well worn and stained from all the years of making them.  Their real name in the recipe book is "Little Filled Pies" and they have various fillings listed for them from sausage and cheese to date and walnut, but they've always had the pizza fillings in our house.  These keep well and reheat well and even eat cold well.

Ingredients:

3-1/4 to 3-3/4 C flour (bread flour if you have it)
2 pkg dry yeast or 4-1/2 tsp bulk dry yeast
2 TBL sugar
1 tsp salt
1 C. water
1/2 C. butter
1 beaten egg
1 TBL water


Mix 1-1/2 C flour, yeast, sugar and salt in a bowl and stir well till combined.  Heat butter and water in a saucepan until warm (120° - you should still be able to stick a finger in it without burning yourself). The butter may not all melt if it's cold. Add the wet ingredients to the dry ingredients and beat with a wooden spoon for 3 minutes (aren't you glad you did all that winch grinding to build up those muscles???). Add enough remaining flour to make a soft dough that cleans off the sides of the bowl.  Knead by hand on a floured surface 5 minutes or till smooth and elastic.


Grease bowl and put dough in, then turn dough over to expose greased surface.  Cover with damp towel and let raise in warm place 30 minutes. 


While the dough is raising, prepare fillings.  We like chopped onion, chopped green or red pepper, cut up ham and pepperoni and shredded mozzarella but seriously you can put about anything in this dough that you like. 


It's a great place to use up leftover meat from last night's dinner. Shredded chicken with spinach and freshly made ricotta would work well also. After the dough rises, preheat your oven to 400° while you make the sandwiches.


Cut dough into 8 balls of equal size.
Roll each ball out into a circle and put 1/8 of each filling on the circle. 


Pull dough up from the sides and pinch together at the top, closing the seam.  Turn seam-side down on greased cookie sheet. Beat egg and 1-2 TBL water and brush sandwiches with egg wash.


Bake at 400° for 20-30 minutes or until golden brown.  Cool 5-10 minutes before serving.  These are good cut in half with a little butter spread inside or dipped in marinara sauce. Wrap them in foil and they reheat well the next day.  Makes 8 large sandwiches.

Saturday, March 10, 2012

Mexican Dip

This is one of our very favorite recipes.  It's incredibly easy, quite fast, and is a great way to get to know people because there's enough to share and it's fun to eat. It's also made, baked, and served all in the same pan so there's very few prep dishes.  Hope you enjoy!

Ingredients:

1/2 large onion, chopped
1 TBL olive oil
1 to 1-1/2# lean ground beef

small can of diced tomatoes and chilis or 1/2 C. salsa
1 can fat-free refried beans
1 envelope of taco seasoning or equivalent spices to taste
8 oz sharp cheddar, shredded
sour cream
tortilla chips - heavier ones that don't break easily

Directions:

Heat olive oil in cast iron skillet till shimmering.  Add chopped onion. Cook 1-2 minutes stirring constantly until just turning clear.


Add ground beef.  Cook until no longer pink.
Add tomatoes or salsa, beans and taco seasoning.  Stir till combined. Spread evenly in skillet.  Wipe top edge of skillet clean with paper towel. Sprinkle cheddar on top.


Bake at 375° for 20 minutes or until the cheese is bubbly. Spoon onto a plate with sour cream and dip chips. Serve with cold beer!


Saturday, March 3, 2012

Bread Pudding With Rum Butter Sauce

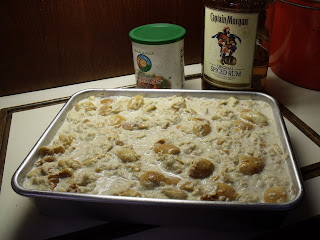
We don't usually end up with very much bread left over around here, but I've been known to make a loaf and let it get stale just to make this recipe. As it turns out, we had some rolls left over in the freezer at the marina that they wanted gone, so it seemed the perfect time to make some. Add a lot of cream and butter and of course some rum, and you have the makings of a perfect dessert.  This recipe makes a full 9 x 13 pan big enough to share at a potluck, but you can cut it in half for an 8 x 8 or a similar size casserole dish.  This recipe is from a famous restaurant but I can't tell you which one or they'd have to shoot me :)

Ingredients
8 eggs
4 egg whites
2 C. milk
4 C. heavy cream
1 TBLcinnamon
1-1/2 TBL vanilla
2-1/2 C. sugar
1-1/4 pounds of bread

Rum Butter Sauce
1 pound butter
1 pound powdered sugar
2 oz spiced rum
1 tsp vanilla
5 eggs,well beaten 


Tear bread up into small pieces about 1" cubed and let sit overnight to dry or toast lightly in low oven. The best bread is a harder bread like French or Italian bread or hard rolls or something similar.  You can also use raisin or cinnamon raisin bread.


Mix eggs and whites in a pan big enough to add the bread cubes later. Beat lightly.

Mix in milk, cream, vanilla, cinnamon, and sugar.  Stir well.


Add bread to liquid mixture, stir and let soak for at least 30 minutes. Yes, it looks disgusting at this point and there really isn't any way to make it look prettier in the picture.


Pour soaked mixture into pan greased with butter.  If you have room in your oven to set this pan in another pan with a small amount of water in it, then bake it in the steam bath.  If not, you can  put a small bowl of water next to it. Whichever you use, this is best done at the dock or in a calm anchorage as spilled water can put out the flame in a propane oven. The purpose of the water is to keep the top from getting too crunchy and keeping the texture moister. Bake at 425 for 2 to 2-1/2 hours. Let cool 10 minutes before serving.

NOTE: This time is extremely tentative.  Ovens vary, and it makes a huge difference what pan you use.  If you cut the recipe in half and bake it in an 8 x 8 it will take somewhat less time.  If you cut the recipe in half and bake it in a 9 x 13 the time will be significantly shorter and the texture will be drier and crunchier.


While baking, melt butter for sauce in saucepan.  Add sugar and stir well.  Add rum and vanilla.  Stir half of hot rum mixture into beaten eggs, stirring constantly.  Return egg mixture to remaining hot rum mixture in a slow stream, stirring constantly.  Cook on low till slightly thickened but do not boil.  Spoon Rum Butter sauce over warm bread pudding and serve warm.