Ed note: updated 3-23-18. See note.
After posting the Beer Tubes post, a couple readers asked if I had attempted something similar for bottles, so here we go.
The bottle box was a much more complicated affair. First of all, what size do you make it, because there are so many beer bottles out there in different sizes? I modeled our box to fit a Killian's Irish Red which is the same height as a Yuengling. If your favorite beer is shorter or fatter, you may need to use a different size dryer duct. Second of all, bottles are too tall to efficiently store them upright so the only conclusion was to lay them on their sides and roll them up. Good in theory, tougher in practice.
I used the same 4" dryer duct tubes to form the box. It requires three of them, and they need to be laid flat out and the corrugated end cut off. One piece will form the front of the box, the width of the panel is almost exactly the length of a long-neck beer bottle, and the other two will be bent to form the sides and back. Here's the specific directions. (I apologize in advance for some of the blurry pics. The macro setting on my camera seems to have gone on the fritz).


Flatten out the first tube. Measure the depth of your fridge that you want the box to be. Cut on that line. Cut all three panels in the same way.
Choose the panel that will be the front of your box. Slide one of the other two panels into the locking grooves.

 Bend that panel at right angles using first your hands and then a ball peen hammer to sharpen up the corner. Remove that panel and repeat with the other side panel.

 Mark each panel because you will be taking them off and putting them back on during the test fit process.
 At this point yo should have something that looks like this.
 Measure for the next fold. This measurement will be the diameter of your beer bottle plus a smidge. You need to allow room for the straps to move as well as the bottle to roll without hinderance.
 Use a table edge or a yardstick to form the next bend, using hands first for the rough bend and then the hammer again for the crisp edge.
 This should be what you have next.
 This is a closeup of what the corner should look like where you slide the two pieces together.

 At this point you should have something like this.
 Tape the loose edges together with painter's tape, just to temporarily hold them together. Measure the width and match it exactly to the width of the front piece so the box is square.
 At this point you should be able to see the two locking channels available to you. Well, at least hopefully you can see better than this blurry pic. The channel you will use to join the back is the one on the top in this picture.
 This is the correct channel to use. the panel to the left in this picture will be cut so that it fits into the groove on the panel to the right of the picture. Mark the left hand panel with a Sharpie and cut it. Be sure to cut carefully and in a perfectly straight line so that it fits into the groove on the right panel.
 Slide the one back panel into the locking channel on the other back panel and tape it with Gorilla Tape. As with the Beer Tubes, don't skimp on this. Regular duct tape will succumb to the moisture always present in boat fridges.
Tape all of the joints at the locking channels with Gorilla Tape.
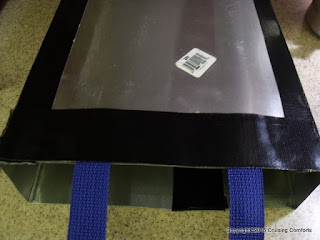
 Cut two pieces of ribbon or webbing that are at least 1" wide, and 2-1/2 times the length of the box. Lay them as pictured and run a length of Gorilla Tape over them from side to side.
 Run the webbing down into the box, across the bottom and back up the other side. Use one of your patiently waiting beer bottles to hold the webbing down.
Cut a piece of dowel rod the width of the box. Cut the webbing so that it is long enough to go around the rod and have an inch and a half to tape to itself.
 I found the box was not stiff enough so I had to add a piece of 1/4x1-1/2 trim to the front edge to stiffen it up. I just taped it on and taped around the edge.

Lay your bottles in like this. I alternated mine facing every other direction and they seem to roll a bit better.
After posting the Beer Tubes post, a couple readers asked if I had attempted something similar for bottles, so here we go.
The bottle box was a much more complicated affair. First of all, what size do you make it, because there are so many beer bottles out there in different sizes? I modeled our box to fit a Killian's Irish Red which is the same height as a Yuengling. If your favorite beer is shorter or fatter, you may need to use a different size dryer duct. Second of all, bottles are too tall to efficiently store them upright so the only conclusion was to lay them on their sides and roll them up. Good in theory, tougher in practice.
I used the same 4" dryer duct tubes to form the box. It requires three of them, and they need to be laid flat out and the corrugated end cut off. One piece will form the front of the box, the width of the panel is almost exactly the length of a long-neck beer bottle, and the other two will be bent to form the sides and back. Here's the specific directions. (I apologize in advance for some of the blurry pics. The macro setting on my camera seems to have gone on the fritz).


Flatten out the first tube. Measure the depth of your fridge that you want the box to be. Cut on that line. Cut all three panels in the same way.
Choose the panel that will be the front of your box. Slide one of the other two panels into the locking grooves.


Tape all of the joints at the locking channels with Gorilla Tape.


Cut a piece of dowel rod the width of the box. Cut the webbing so that it is long enough to go around the rod and have an inch and a half to tape to itself.


Lay your bottles in like this. I alternated mine facing every other direction and they seem to roll a bit better.
Here's the video demonstration. It's completely functional, but not near as elegant as the Beer Tubes. But hey, at least you can get a beer without removing everything else from the fridge. The energy savings alone should pay for a six pack before long. Enjoy!
Note: I have since changed the design a little. I removed the straps and added a piece of Phifertex. I taped it along the top edge, made it long enough to go to the bottom and back up the other side and rolled out around a piece of wooden dowel to use as a handle. The bottles tended to fall out of the straps and the Phifertex makes a nice cradle for them to sit in.
Note: I have since changed the design a little. I removed the straps and added a piece of Phifertex. I taped it along the top edge, made it long enough to go to the bottom and back up the other side and rolled out around a piece of wooden dowel to use as a handle. The bottles tended to fall out of the straps and the Phifertex makes a nice cradle for them to sit in.


