Tuesday, November 8, 2016

Tuesday Tips #14 - A Good Log Book

We were on a good friend's boat and he made an entry in his logbook which was a calendar. We were intrigued. He told us it's the easiest way for him to remember to write entries After a little experimenting we ended up buying the At-A-Glance Weekly/Monthly appointment book and have been using it for the last three years.

The At-A-Glance has a section for each month that's a two-page month calendar with large blocks for each day. We use that for general entries like, "Had sundowners with..." After the month calendar spread, it has columns of hourly entry lines, one column for each day with a week taking up a two-page spread. When we're underway we use these pages to log our watch changes, to log GPS position, and to log destinations and alternates. When we're not underway we log whatever chores we did or major projects. When we're in the middle of a summer refit like we are right now, we log detailed info about the projects we're working on. In the back of the book there's a section for future planning which we use to log our diesel, gasoline, and propane purchases as well as our water usage and pumpout records.

The book is reasonably priced, easy to write in, and stores easily in our nav station. If you balk at the price of marine logbooks, this just might be the solution for you.

Tuesday, November 1, 2016

Tuesday Tips #13 - Data Management

We're fortunate enough to have a really large data plan with Verizon, a benefit that comes from being with them from the very beginning of cell phones. Yet, still we come close to using it all before the month is up and have to manage our use. There are some very simple things you can do to help along those lines:

  1. Turn off your mobile data at night so apps don't run in the background
  2. Turn off your automatic update of apps, even over wifi because if you're using a hotspot it will update when it's connected to the hotspot.
  3. Turn off the autoplay of videos in your browser and on Facebook.
  4. Download the Opera mini browser. It has a data save function that blocks some ads.
  5. Download a data tracking widget to your front page on your phone or iPad so you're always aware of how much you have left.
  6. Use the app ShareIt to move photos and videos from you phone to your computer or between phones. It moves them without using data.
These are just a few basic things to try to reduce your data usage. When we go to the Bahamas we make drastic cuts and do with just 4gb of data per month, but then we have some incredibly beautiful water, sky, and beaches to look at and explore so who wants to be staring at a screen anyway?


Tuesday, October 25, 2016

Tuesday Tips #12 - Project Fatigue

There's always something begging to be done when you live on a boat. The stainless needs polished, the teak needs touched up, the deck has yesterday's accumulation of salt crust...you name it, it needs done. Even worse is the summer refit, a time when most cruisers hide out from hurricane season and work on The List of more major things that need done that didn't get done while turquoise waters and white sand beaches beckoned. We're nearing the end of such a summer refit, and I'm tired. Not just regular "it's close to bed time after a long day" tired, but tired to the bone and that's a dangerous place to be when you live on a boat. It's why a lot of cruisers quit cruising because things get added to the bottom of the list faster than they get taken off the top. It's called project fatigue.

If you want to be successful at cruising, you need to learn how to manage project fatigue. Sure, there's times when you just have to push through to get something done, but on the regular project list, you sometimes need to take a step back and remember why you're doing this. Sit in the cockpit and watch the mama manatee lift her new baby up to take a breath. Catch the beautiful sunrise. Go sailing for an afternoon when someone asks if you'll help them with their new boat. Smell the ocean air. Laugh at the antics of the pelicans fishing for their lunch. Ride your bike into town and get a double scoop of Moose Tracks. The project list will still be there when you come back to it and you'll have some new energy to tackle it.


Tuesday, October 18, 2016

Tuesday Tips #11 - Popcorn

On the subject of limited space...one of the difficult things to try to stock up on when we go to the Bahamas is chips. For the most part, we don't stock up on a lot of things before we go because we try to support the local economy since we're using their resources. There are a few exceptions to this rule though, as some things are just too expensive over there to justify buying and chips is one of them. A bag of Doritos that might cost you $3.79 here in the States is going to set you back about $8.00 over there. And beer? It will set you back between $3.00 and $4.00 per bottle. Some things are just non-existent like good decaf coffee and Fair Trade chocolate, so we stock up on just those few things.

For a while we solved the chips problem by buying Pringles but, let's face it, Pringles are OK for a minor diversion, but when you want a good potato chip they just don't cut it. Don't get me wrong - the packaging is great for boats since they can't crush and they take up a fraction of the space of a bag of chips. They just lack in the taste department.

The last time we went over we decided to go a whole different direction and buy popcorn. We don't have a microwave on Kintala, so we buy the regular organic unpopped popcorn kernels that come in a big bag for just a couple bucks. You get an incredible amount of popcorn for the money. And if you want it flavored? We buy this cheddar powder and butter powder which keep really well in the cupboard. Price wise - one 15.75 ounce bag of Lay's Classic chips has about 13 cups of chips in it for around $4.00. One jar of Orville Redenbacher's popcorn kernels costs about the same amount and it makes 240 cups of popcorn. To make it even more of a contrast, I usually buy the store brand of popcorn which is usually at least a dollar cheaper. Easy on the budget and easy on the storage space. It's a win-win.

Tuesday, October 11, 2016

Tuesday Tips #10 - Natural Deoderant

Using commercial deoderant really bothers me. Have you ever really studied the label? It's scary. Add to that the fact that it builds up and it was starting to make these very weird dark stains in my underarms and I was ready to try something new.

My daughter, who feels the same way about the stuff, has tried many different natural concoctions, but none of them have worked for me. So color me surprised when I bought a bottle of Magnesium Oil for my husband to use for its alleged properties of helping with insomnia and restless leg syndrome, and read on the label that it also makes a great natural deoderant. I've been using it every since and have been very pleased.

A word of caution: Not everyone can use this stuff. It appears that some people are very sensitive to it and react with severe itching. They tell you that if you are magnesium deficient, you may react more severely. They tell you to try just a small amount on the bottom of your feet, and if you don't react then you can progress to using more of it. I have never reacted to it since we bought it and have been using it as deoderant quite successfully for some time now. My daughter, on the other hand, reacted like she had poison ivy, so if you decide to try it, go slow and see how you do. I'm really happy that I found something that works as deoderant that's actually good for me! Oh, and the insomnia thing? Jury's still out on that one.

Tuesday, October 4, 2016

Tuesday Tips #9 - Portable Music

One of the things we try to do while cruising is to attend any drum circles we find. We've gone to the Coconut Grove Drum Circle by the Dinner Key Mooring Field that's held on the Saturday of the full moon each month. We've also gone to the very famous and long-standing Siesta Key Drum Circle, that meets every Sunday evening from about 6:00 pm till dark, year round. The problem with being a drummer is that drums take up a lot of room, and space is at a premium on most cruising boats.

A few months ago I happened on a new idea that Remo came up with. Remo is the manufacturer of many styles of replacement drum heads, and they designed a drum head that could be snapped on any 5 or 6 gallon bucket. Hmmm I don't think I've ever run across a cruising boat that didn't have at least one 5 gallon bucket on hand so this seemed like a really great idea. You can buy them in many styles. They have one that's labeled "Comfort Sound Technology" which is more of a fabric skin and produces a softer, more mellow sound that can be played indoors. Their regular heads come in three tones: a low, medium, and high pitch. We ordered the comfort sound technology head and a low tone head from Lone Star Percussion in Dallas, Texas, only because they had the best price at the time with the shortest delivery. The heads come in perfect cardboard boxes to store them in. We also ordered one of their dedicated Rhythm Pal buckets because it was a better shape than the $3 ones you get at Lowes. The drum produces a very nice tone and has been tested repeatedly at the drum circle. The really nice thing about it is that the head snaps off easily so you can store your sticks inside. We also store our maracas and our tambourine inside when we're not using the drum. Remo's bucket comes with a strap as well, so it's easy to carry - an important benefit because a lot of drum circles are a good walk from wherever you are. So if you've always wanted to have a drum on board or even if you're land locked and you want a very inexpensive way to get into drumming, try it out.

Tuesday, September 27, 2016

Tuesday Tips #8 - A Great Stain Remover

One of the things that we try to do on the boat is to have as many items that can serve more than one purpose. The more of these you have, the less space you take up. An example of this would be our laser thermometer - the one that's supposed to be used to check the temp of the engine block which also happens to serve as the yeast dough liquid temp checker.

Another really good one is something you may not have though of before - that old bottle of hydrogen peroxide that's in the back of your medicine cabinet. It turns out that it works incredibly well as a stain remover on clothes.

All of my shirts that I wear on the boat seem to have stains on them. The galley is small, and I cook a lot, so I inevitably end up wearing food of some sort or another. The night before I go to the laundry I squirt hydrogen peroxide all over the stains, soaking them really well, and then stuff them in the laundry bag. I wash as normal the next day and voilá! Stains all gone. I even use it on colored clothes and it doesn't bleach out the color like bleach does. It has worked on greasy stains, colored stains like strawberry, and just about any other type I've used it on. Hairspray still works the best on ink stains though. Happy laundry day!

Tuesday, September 20, 2016

Tuesday Tips #7 - Keepin' it Cold

There is not a cruiser on the planet that doesn't hate their top-opening fridge. They're hard to organize and inevitably the thing you need is on the bottom. While I've solved some of those issues with the Beer Tubes and Beer Box, the one thing I've had problems with is the loss of cold through the top lids. I've tried a bunch of different seals and I've insulate the lids with extra styrofoam board, but after a sundowner discussion with another cruiser I decided to try a different approach. I bought a memory foam kitchen mat and cut it to fit the top of the fridge. I lay it out on top at night or if we're going to be gone for the day, but since it's kind of a pain to get it on and off, I don't leave it there during the day when we're in and out of the fridge a lot. It has made a substantial difference in how cold the interior of the fridge stays. When we're on the dock and have air conditioning like this summer we won't use it much, but when we're on the anchor and in warm weather I suspect it will be use all the time. When it's not in use, it rolls up and stows nicely in the aft cabin. Not bad for a $20 investment.

Tuesday, September 13, 2016

Tuesday Tips #6 - The Greening of Crusing

You know how the doc is always trying to tell you that green leafy things are healthy for you? Well, it turns out that's true in more than one way. According to a study done by NASA, it turns out that many common house plants remove toxins from the air in enclosed spaces. And whether or not you see any personal results in the toxin department, looking at a plant is known to have a calming effect. We have an English Ivy onboard that we've had almost since we bought the boat, one we've named Starbuck. Whether or not he actually removes any toxins, Starbuck has become a mascot of sorts. He started out life as a $1.25 tiny pot from Wal-mart and has since spawned several young'ns that are living on other boats. So dust off your green thumb and give it a try!


Tuesday, September 6, 2016

Tuesday Tips #5 - Coffee Stains and Stainless

I don't know about you, but I've just about finished converting all of our drinkware to stainless steel. We have the Thermos brand coffee mugs that keep things either hot or cold for hours on end, and the Thermos brand cold drink 16 oz thermos and our giant stainless tall cups for when we're underway. The problem with all of this stainless is that coffee and tea do, in fact, stain it. While I have one of those nifty long-handled brushes to reach down into these narrow-mouthed, tall cups, it just doesn't get rid of the deep-down stains that accumulate over time. The best solution I've found so far is to fill them up with hot water, plop in two denture cleaning tablets, and let them sit overnight. In the morning, wash with soapy water as usual and the cups will look brand new inside. This works great for porcelain cups as well but we don't have any on the boat due to breakage risks. The denture tablets work on pretty much anything stainless, including pots and pans that might have discolored from something you cooked. I usually just buy the store brand, but any of the ones in your local store or on Amazon will work.

Tuesday, August 30, 2016

Tuesday Tips #4 - Trashy Talk

Tuesday Tips #4 - Trashy Talk

One of the biggest challenges in living on a boat is trash. If you're underway on an extended voyage, or if you're in the islands where it might be a week till you get somewhere that has trash pickup, storing your trash can be a challenge. On Kintala we've come up with a method that helps us deal with it.

  1. We deal with as much trash as possible before we leave the store parking lot or dinghy dock. We remove anything from cardboard boxes - cereal, crackers, bacon, soda - if it comes in a cardboard box it gets removed and the boxes tossed. Even in the States we bring our cart out of the store, park it right by the trash or recycling bins, and go to work. Anything that can be bought in bulk and stored in reusable containers is great - flour, sugar, oats, pasta.
  2. We transfer milk from the plastic container into quart stainless bottles. It's easier to get to the milk (which is usually on the bottom) if you're only trying to pull out a narrow quart jug instead of a full gallon jug. It also gives us the opportunity to recycle the plastic jug while we're near trash rather than carrying it with us.
  3. Anything that can be washed, dried, and squashed is then stowed in a dry trash bag - glass bottles, tin cans (flattened), aluminum cans, plastic jars and bottles, paper, cardboard. The dry bag can be stored anywhere in the boat, even on the aft berth, without fear of odor or drips.
  4. Anything organic that can go overboard does. We have a "does it float?" test. If it floats and we're at anchor or in a harbor, we don't toss it overboard. Nobody wants to be enjoying their pristine sunset vista with somebody else's salad floating by. Examples are lettuce, orange skins, egg shells. If it sinks, it goes overboard. Examples are pretty much any meat bones, some meat scraps.
Following these procedures leaves us with only the remaining food scraps that can't go over as well as coffee filters and other soiled paper and plastic - we can usually go 10-14 days on one tall kitchen can bag. I recently read an article about a woman who generates no trash. We're a long way from that, but working toward it the best we can.

Tuesday, August 23, 2016

Tuesday Tips #3 - Even Heat

Tuesday Tips #3 - Even Heat

Baking in a boat galley oven has its challenges. Most galley ovens, at least the older ones that seem to grace most sailboats I have the fortune of visiting, are badly insulated and made of lightweight, thin metal. Keeping an even distribution of heat is a challenge, at best. If your galley oven is constructed like mine, it has a metal subfloor. Locate a pizza stone that fits that space, or use a combination of unglazed terra cotta tiles to line that subfloor. The stone will absorb the heat and redistribute it evenly throughout the oven cavity. It will also maintain the heat when you open the oven to check on things or to rotate them, so you will use much less propane. I was unable to find a rectangle pizza stone that fit my oven so I purchased the terra cotta tiles. If you use them, be sure to verify with the dealer that the tiles are lead-free. All tiles sold in the U.S. are supposed to be lead-free but I had the vendor contact the manufacturer to be sure. I bake my pizza directly on the tiles with only parchment paper between, and lead was not the seasoning I was looking for. The terra cotta tiles are also much less expensive than a pizza stone of comparable size, so they can be replaced when they get too dirty. Now with the tiles installed, my cakes are more evenly baked, my pizza crusty, and the cook happy!


Tuesday, August 16, 2016

Tuesday Tips #2 - The Cold Butter Problem

Tuesday Tips #2- The Cold Butter Problem


I love baking, and moving onto the boat hasn't changed that. Our Tartan 42 has a wonderful galley, and I bake often in it. I also happen to have a captain with a particular penchant for cookies. Inevitably, making cookies is an impromptu thing, spurred on by the realization that I've already heated the oven for dinner and may as well not waste the propane used to heat up the oven. This usually results in the realization that I don't have enough softened butter to cream with the sugar, something I nearly always do by hand. After a lot of experimentation, I've come up with a solution to the dilemma that works so well that I use it for biscuits, pie crust, and any other recipe that requires cutting cold butter into a flour mixture. All you need is a very inexpensive cheese grater like this one, although I've had mine for over twenty years.

Take your chilled or frozen stick of butter and grate it into your bowl. If you're cutting the butter into a flour mixture, then grate about a half inch of the stick and stir that in, then repeat until it's all mixed in. Using a whisk, it will cut into the flour mixture in no time. If you grate it all then try to stir it in, it will clump into a ball and make it harder. If you're grating it into sugar to cream, do a small portion as well, mixing it lightly into the sugar until you have it all grated. After its lightly mixed in then you can beat it to cream it into the sugar. Enjoy!

Tuesday, August 9, 2016

Tuesday Tips #1 - The Venerable Spatula

I have a lot of people ask me how I've handled various things on our boat so I decide to start a "Tuesday Tips" section on Cruising Comforts. If you have any suggestions or questions for future posts, please leave a comment and I'll try to address it.


Tuesday Tips #1 - The venerable Spatula


A good, silicone spatula is one of the most valuable tools in the galley. Aside from the obvious, that you can easily scrape all the peanut butter out of a jar and save you money, it can save you many unpleasant hours of boat plumbing by scraping dinner plates clean and not running the greasy remnants down the drain. It saves precious washing and rinsing water by scraping the dishes before washing as well. I use mine every single day, so much so that I have three of this particular model. I like it the best because it has a smallish head that fits into most jars, and the edges are sharp so they clean incredibly well. It's offered on Amazon, but it only comes in a package of three assorted spatulas, the other two of which I gave away. In my mind, it's cheap insurance. I can think of many better ways to spend the afternoon than cleaning out the sink trap.


Thursday, July 28, 2016

Gluten Free Rice Flour Tortillas

As I've mentioned before on the blog, my grandkids have major food allergies. They were coming to visit us on the boat and I had to come up with some new recipes for them. One of them is allergic to wheat, the other to all forms of dairy, both of them have sensitivities to corn and potatoes. All of the starches and the xanthum gum used in typical gluten free flour mixes cause them problems. The only completely safe flour for them at the moment is rice. Trying to find a 100% rice flour tortilla recipe was daunting. I began to experiment with a few and ended up combining a couple of them to end up with this successful one. Most of the ones I tried left me with a sort of tostada crunchy tortilla, one that would not roll up or fold without cracking. This modified recipe leaves you with a soft, rollable tortilla with great flavor and consistency. 
Rice flour tortillas must be made pretty soon before eating and they don't really keep very well, so plan accordingly. Do not use white rice or sweet rice flour for these tortillas. Only brown rice flour will work. I apologize for the lack of step-by-step photos in this post, but I had three small children "helping" me so it limited my picture taking!

Ingredients:

2 c water
1 tsp salt
1-2 tsp olive oil
2 c brown rice flour

Directions:

Heat the water, salt, and oil in a small saucepan until not quite boiling. Add the flour all at once and stir vigorously with a heavy wooden spoon. The mixture will form into a stiff dough quickly and will make a ball. If it doesn't, add a bit more flour and continue to mix until a ball is formed.

Cover the ball with plastic wrap and let it stand for 10 minutes.

Knead the dough until it's smooth and consistent in texture.

Break off a plum-sized ball and roll it between sheets of parchment until it's very thin. You will need to remove the parchment, replace it loosely, flip, remove the parchment on the other side, replace it loosely, then roll again. Do this several times during the course of the rolling to prevent the dough from shrinking the paper into wrinkles.

When the dough is thin, peel one side of the paper off and flip the paper over, transferring the tortilla to a medium hot griddle or iron skillet. Peel the paper off the top and allow the tortilla to cook until bubbles form on the surface and small golden areas appear on the underside. Flip and cook until the other side is the same.


Transfer the tortilla to a plate lined with parchment. Place another parchment square on top of the tortilla and invert another plate on top. Continue to stack the tortillas between squares of parchment under the plate. The two plates will trap the moisture and the tortillas will absorb the moisture back into them, giving you soft tortillas. 


Note: There is one exception to using white rice flour. If you need a sticky tortilla to roll for chimi changas, then use sweet rice flour. The tortillas are very much harder to roll and to transfer, but they stick well to themselves with a brush of water and stretch a bit easier to contain the fillings before you fry them. The brown rice flour tortillas work best for hand held burritos and tacos, but for anything fried, they cracked when rolled tight enough. The chimi changas with the white rice flour were delicious!

Thursday, July 7, 2016

Gluten Free Rice Flour Tortilla Chips

My grandchildren have inherited my generation's unfortunate desecration of the food supply in the form of multiple food allergies. Three of my nine grandchildren are coming to visit next week, so the sailing vessel Kintala's allergy-free test kitchen is in full testing mode today for new recipes. I actually came up with this recipe as a result of trying to make some form of rice tortilla or wrap. My original attempt didn't result in anything appealing so, in an effort to salvage what I had made, I decided to convert them to tortilla chips to use for scooping hummus. They were a grand success. If you happen to have a gluten free issue, please try these. They are super quick and easy to unbelievably inexpensive, and are much more delicious than any I've bought in the store.


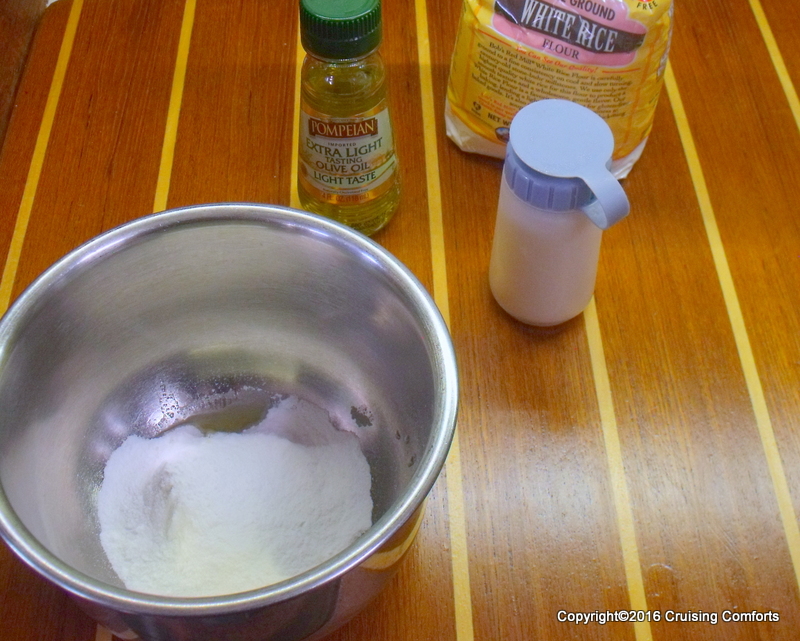
Measure 1/4 C white rice flour into a small bowl. Organic rice flour is best, but I didn't have any at the moment so I used regular. Add 1/4 tsp of olive oil and 1/8 or less tsp of salt to the rice flour and stir.
Add a little water at a time while stirring with a wooden spoon until a ball forms and cleans the sides of the bowl. It should look and feel like play dough - soft but not sticky. If you add too much water, don't worry - just add a bit more rice flour until the consistency is correct.
Divide the dough into two balls.
Sprinkle a bit of rice flour onto a square of waxed paper or parchment paper. Press the ball out into a circle with your fingers.
Sprinkle a bit more rice flour onto the dough and top with another piece of waxed paper. Roll the dough with a very light touch on the roller. Stop periodically and remove the paper, add a bit more rice flour, replace the paper, flip, and repeat. Do this until the circle is about 9" across and as thin as you want your chips. Thinner yields lighter chips, thicker yields crunchier chips. Just remember that the thinner the dough, the harder to transfer it to the pan.


Remove the top paper and, using the bottom paper, flip onto a medium hot griddle. Remove the paper that you used to transfer it. Cook until small bubbles appear, flip, and cook again until the dough is set and the edges start to lift. It will not get browned so don't over cook it.
While the tortilla is cooking, heat a couple cups of oil in a small pan to between 350° and 360°. It doesn't take much oil. If you are making the cinnamon sugar version of these, I think you could use coconut oil but I haven't tried it. I use our infrared thermometer for this and it works well.


Cut the tortilla into 6 wedges with a knife or pizza cutter.
Place 3-4 of the wedges into the hot oil. They will immediately puff up and float to the surface. Cook them for about a minute (depends on your oil temp) until the bottom starts to get golden, then flip them with a slotted spoon.


Cook them another minute or less until the second side is golden.
Remove them to a cooling rack or cookie sheet lined with paper towels to drain.
Immediately salt them while still warm. You can use a fine regular salt, garlic salt, cinnamon sugar, or any other seasoning. The finer the consistency of the seasoning, the better it will stick. Cool them completely. I'm not sure about storing them. I will update later. At this point, I think it's best to make small batches that you will use right away. One of these recipes makes 12 chips. What you see here is two recipes' worth.

These are super crispy and excellent for scooping hummus.


Enjoy!

Friday, July 1, 2016

Easiest Way to Cut a Pineapple

Here's a little video to help you with your holiday weekend picnic preparations. Have a great weekend!