 There is not a cruiser on the planet that doesn't hate their top-opening fridge. They're hard to organize and inevitably the thing you need is on the bottom. While I've solved some of those issues with the Beer Tubes and Beer Box, the one thing I've had problems with is the loss of cold through the top lids. I've tried a bunch of different seals and I've insulate the lids with extra styrofoam board, but after a sundowner discussion with another cruiser I decided to try a different approach. I bought a memory foam kitchen mat and cut it to fit the top of the fridge. I lay it out on top at night or if we're going to be gone for the day, but since it's kind of a pain to get it on and off, I don't leave it there during the day when we're in and out of the fridge a lot. It has made a substantial difference in how cold the interior of the fridge stays. When we're on the dock and have air conditioning like this summer we won't use it much, but when we're on the anchor and in warm weather I suspect it will be use all the time. When it's not in use, it rolls up and stows nicely in the aft cabin. Not bad for a $20 investment.
Showing posts with label Galley Tips and Tools. Show all posts
Showing posts with label Galley Tips and Tools. Show all posts
Tuesday, September 20, 2016
Tuesday Tips #7 - Keepin' it Cold
There is not a cruiser on the planet that doesn't hate their top-opening fridge. They're hard to organize and inevitably the thing you need is on the bottom. While I've solved some of those issues with the Beer Tubes and Beer Box, the one thing I've had problems with is the loss of cold through the top lids. I've tried a bunch of different seals and I've insulate the lids with extra styrofoam board, but after a sundowner discussion with another cruiser I decided to try a different approach. I bought a memory foam kitchen mat and cut it to fit the top of the fridge. I lay it out on top at night or if we're going to be gone for the day, but since it's kind of a pain to get it on and off, I don't leave it there during the day when we're in and out of the fridge a lot. It has made a substantial difference in how cold the interior of the fridge stays. When we're on the dock and have air conditioning like this summer we won't use it much, but when we're on the anchor and in warm weather I suspect it will be use all the time. When it's not in use, it rolls up and stows nicely in the aft cabin. Not bad for a $20 investment.Tuesday, September 13, 2016
Tuesday Tips #6 - The Greening of Crusing
 You know how the doc is always trying to tell you that green leafy things are healthy for you? Well, it turns out that's true in more than one way. According to a study done by NASA, it turns out that many common house plants remove toxins from the air in enclosed spaces. And whether or not you see any personal results in the toxin department, looking at a plant is known to have a calming effect. We have an English Ivy onboard that we've had almost since we bought the boat, one we've named Starbuck. Whether or not he actually removes any toxins, Starbuck has become a mascot of sorts. He started out life as a $1.25 tiny pot from Wal-mart and has since spawned several young'ns that are living on other boats. So dust off your green thumb and give it a try!
Tuesday, September 6, 2016
Tuesday Tips #5 - Coffee Stains and Stainless

 I don't know about you, but I've just about finished converting all of our drinkware to stainless steel. We have the Thermos brand coffee mugs that keep things either hot or cold for hours on end, and the Thermos brand cold drink 16 oz thermos and our giant stainless tall cups for when we're underway. The problem with all of this stainless is that coffee and tea do, in fact, stain it. While I have one of those nifty long-handled brushes to reach down into these narrow-mouthed, tall cups, it just doesn't get rid of the deep-down stains that accumulate over time. The best solution I've found so far is to fill them up with hot water, plop in two denture cleaning tablets, and let them sit overnight. In the morning, wash with soapy water as usual and the cups will look brand new inside. This works great for porcelain cups as well but we don't have any on the boat due to breakage risks. The denture tablets work on pretty much anything stainless, including pots and pans that might have discolored from something you cooked. I usually just buy the store brand, but any of the ones in your local store or on Amazon will work.
Tuesday, August 30, 2016
Tuesday Tips #4 - Trashy Talk
Tuesday Tips #4 - Trashy Talk
One of the biggest challenges in living on a boat is trash. If you're underway on an extended voyage, or if you're in the islands where it might be a week till you get somewhere that has trash pickup, storing your trash can be a challenge. On Kintala we've come up with a method that helps us deal with it.- We deal with as much trash as possible before we leave the store parking lot or dinghy dock. We remove anything from cardboard boxes - cereal, crackers, bacon, soda - if it comes in a cardboard box it gets removed and the boxes tossed. Even in the States we bring our cart out of the store, park it right by the trash or recycling bins, and go to work. Anything that can be bought in bulk and stored in reusable containers is great - flour, sugar, oats, pasta.
- We transfer milk from the plastic container into quart stainless bottles. It's easier to get to the milk (which is usually on the bottom) if you're only trying to pull out a narrow quart jug instead of a full gallon jug. It also gives us the opportunity to recycle the plastic jug while we're near trash rather than carrying it with us.
- Anything that can be washed, dried, and squashed is then stowed in a dry trash bag - glass bottles, tin cans (flattened), aluminum cans, plastic jars and bottles, paper, cardboard. The dry bag can be stored anywhere in the boat, even on the aft berth, without fear of odor or drips.
- Anything organic that can go overboard does. We have a "does it float?" test. If it floats and we're at anchor or in a harbor, we don't toss it overboard. Nobody wants to be enjoying their pristine sunset vista with somebody else's salad floating by. Examples are lettuce, orange skins, egg shells. If it sinks, it goes overboard. Examples are pretty much any meat bones, some meat scraps.
Tuesday, August 23, 2016
Tuesday Tips #3 - Even Heat
Tuesday Tips #3 - Even Heat
 Baking in a boat galley oven has its challenges. Most galley ovens, at least the older ones that seem to grace most sailboats I have the fortune of visiting, are badly insulated and made of lightweight, thin metal. Keeping an even distribution of heat is a challenge, at best. If your galley oven is constructed like mine, it has a metal subfloor. Locate a pizza stone that fits that space, or use a combination of unglazed terra cotta tiles to line that subfloor. The stone will absorb the heat and redistribute it evenly throughout the oven cavity. It will also maintain the heat when you open the oven to check on things or to rotate them, so you will use much less propane. I was unable to find a rectangle pizza stone that fit my oven so I purchased the terra cotta tiles. If you use them, be sure to verify with the dealer that the tiles are lead-free. All tiles sold in the U.S. are supposed to be lead-free but I had the vendor contact the manufacturer to be sure. I bake my pizza directly on the tiles with only parchment paper between, and lead was not the seasoning I was looking for. The terra cotta tiles are also much less expensive than a pizza stone of comparable size, so they can be replaced when they get too dirty. Now with the tiles installed, my cakes are more evenly baked, my pizza crusty, and the cook happy!
Tuesday, August 16, 2016
Tuesday Tips #2 - The Cold Butter Problem
Tuesday Tips #2- The Cold Butter Problem
 I love baking, and moving onto the boat hasn't changed that. Our Tartan 42 has a wonderful galley, and I bake often in it. I also happen to have a captain with a particular penchant for cookies. Inevitably, making cookies is an impromptu thing, spurred on by the realization that I've already heated the oven for dinner and may as well not waste the propane used to heat up the oven. This usually results in the realization that I don't have enough softened butter to cream with the sugar, something I nearly always do by hand. After a lot of experimentation, I've come up with a solution to the dilemma that works so well that I use it for biscuits, pie crust, and any other recipe that requires cutting cold butter into a flour mixture. All you need is a very inexpensive cheese grater like this one, although I've had mine for over twenty years.
Take your chilled or frozen stick of butter and grate it into your bowl. If you're cutting the butter into a flour mixture, then grate about a half inch of the stick and stir that in, then repeat until it's all mixed in. Using a whisk, it will cut into the flour mixture in no time. If you grate it all then try to stir it in, it will clump into a ball and make it harder. If you're grating it into sugar to cream, do a small portion as well, mixing it lightly into the sugar until you have it all grated. After its lightly mixed in then you can beat it to cream it into the sugar. Enjoy!
Tuesday, August 9, 2016
Tuesday Tips #1 - The Venerable Spatula
I have a lot of people ask me how I've handled various things on our boat so I decide to start a "Tuesday Tips" section on Cruising Comforts. If you have any suggestions or questions for future posts, please leave a comment and I'll try to address it.
 A good, silicone spatula is one of the most valuable tools in the galley. Aside from the obvious, that you can easily scrape all the peanut butter out of a jar and save you money, it can save you many unpleasant hours of boat plumbing by scraping dinner plates clean and not running the greasy remnants down the drain. It saves precious washing and rinsing water by scraping the dishes before washing as well. I use mine every single day, so much so that I have three of this particular model. I like it the best because it has a smallish head that fits into most jars, and the edges are sharp so they clean incredibly well. It's offered on Amazon, but it only comes in a package of three assorted spatulas, the other two of which I gave away. In my mind, it's cheap insurance. I can think of many better ways to spend the afternoon than cleaning out the sink trap.
Tuesday Tips #1 - The venerable Spatula
 A good, silicone spatula is one of the most valuable tools in the galley. Aside from the obvious, that you can easily scrape all the peanut butter out of a jar and save you money, it can save you many unpleasant hours of boat plumbing by scraping dinner plates clean and not running the greasy remnants down the drain. It saves precious washing and rinsing water by scraping the dishes before washing as well. I use mine every single day, so much so that I have three of this particular model. I like it the best because it has a smallish head that fits into most jars, and the edges are sharp so they clean incredibly well. It's offered on Amazon, but it only comes in a package of three assorted spatulas, the other two of which I gave away. In my mind, it's cheap insurance. I can think of many better ways to spend the afternoon than cleaning out the sink trap.
Friday, July 1, 2016
Easiest Way to Cut a Pineapple
Here's a little video to help you with your holiday weekend picnic preparations. Have a great weekend!
Wednesday, December 16, 2015
Top Ten Most Usable Galley Tools
Now that we've been living on this boat for more than four years I thought I would do an evaluation of the top galley tools that I use constantly. Most of these are so useful that I wish I had bought multiples of them. If they are still available I have linked to them in the titles. If they are not still available, similar items are out there. So, without further adieu, here's the list that made the cut.

What it is: A very small silicone spatula that has very fine, sharp edges and a square shape to the bottom with a bamboo handle. It came as one o a set of three. The other two I rarely use, but this one doesn't seem to ever be offered by itself.
Why it works: This spatula is only 1-3/8" x 2" so it's small enough to fit inside most of the small jars that I use on the boat. The super fine, sharp edges completely clean whatever I'm using it on which means that I'm not washing the remnants of whatever jar, skillet, plate, bowl, or leftover container down the drain where they will clog the hose. It has lasted me for four years with multiple times each day use. You can see in the picture that the edges are now starting to chip a bit, but this is not reflection on the quality of the product, only on the extent of use.
 Good Quality Ice Pick
What it is: Mine is a 70-year old ice pick handed down to me from my dad. I have no idea where it came from, only that it has served well and is one of the most valuable tools in my galley
Why it works: The key to choosing a usable ice pick is to look for one with the pick securely attached to the handle. Most of the cheaper ones will separate rather quickly. You can sometimes find the ones that the pick and handle are all one piece of stainless. I can't recommend any specific one currently available as I have never had to buy one. We use ours for ice, naturally, but it also comes in handy for poking cakes that you're pouring sauces onto (think Tres Leches Cake), for tenderizing meat (wash carefully after), for aligning screw holes, and would come in handy as a defense mechanism in the event that your boat was boarded by undesirables.
 Chef'n Prep Bowls
What it is: A set of nesting, silicone prep bowls that measure 1/4 cup, 1/3 cup, 1/2 cup, and 1 cup.
Why it works: This set of silicone bowls is one of those I wish I had bought several of. We use them for everything. They measure and have pinchable areas on one side that form a sharp pouring spout. They also make great small bowls for serving dips and appetizers, or for olives or nuts, or just about anything else you can think of. They wash up beautifully, are easy to store, and don't rust. They no longer offer this color scheme, but the bowls seem to be the same.
 Comet Brand Drip Coffee Pot
What it is: My coffee pot is a very old 50s vintage aluminum pot that I inherited from my dad. It has a base with handle, a nesting filter basket, a water container that sits on top and the lid. It makes 4 cups of coffee or 2 large mugs.
Why it works: This pot makes perfect coffee. You boil the water in a tea kettle and pour it into the water container that you stack on top of the filter basket that you stack on top of the base. The water filters through the coffee in the filter basket and then you remove the water container and filter basket and replace the lid on the base. I know there is a tremendous popularity of the French press coffee makers, but I hate cleaning them on the boat because it's difficult to keep the grounds out of the drain and uses a lot of water to clean. This filter basket accepts a standard coffee filter which is easy to toss when you're done. You can still buy these on eBay and other vintage outlets.
 GSI Outdoors Silicone Collapsible Java Drip
What it is: A 1-4 cup coffee maker that easily collapses and stores on a boat.
Why it works: If we're only making a single cup or mug of coffee, this is our go-to coffee maker. It sits on top of the cup and accepts a cone coffee filter. You pour hot water directly on the grounds in the filter and allow it to soak down into the cup. It takes very little time to make, cleans up easily, and stows in a very small space.
 Any Brand of Parchment Paper
What it is: Parchment paper, if you've never used it before, is a super slippery non-stick paper that allows you to cook without burning or sticking.
Why it works: I simply can't cook on a boat without this stuff. I use it under all of my cookies which allows me to slide the paper off the cookie sheet (I only have one on the boat) and get the next batch going in the oven. I also use it under pizza and place it directly on my baking stones in my oven. I line loaf pans with it when I make banana bread, and roll dough out on it on my counter. It's absolutely essential in boat ovens which are known to have uneven heat. It helps to protect the bottoms of cookies and biscuits and any other baked good from sticking or burning. You can get the Reynolds brand in just about any grocery store, but Big Lots has a brown version that is a fraction of the price. Even most dollar stores carry it.
 Small Water-tight locking-lid containers
What they are: These two examples are very small, but I have many versions on the boat, many of them much larger. Any brand of waterproof, locking-lid container is fine but I use these two very small ones the most. The round one is about 3" and holds 1/2 cup and the rectangle one is about 3x5 and holds 1 cup.
 Why they work: Top-loading boat refrigerators are extremely difficult to organize. Things topple over, get squished, and the lids of regular containers get popped off, spilling the contents everywhere. The only thing worse than organizing a marine top-loading fridge is cleaning one. In addition, things get forgotten in the bowels of these refrigerators and these airtight containers keep the spoilage in and also any resulting odor. The round ones pictured here I found at Big Lots, and the rectangle ones I bought at Aldi on one of their weekly special. This small container was one of a set of three nesting ones. The larger ones I use to store pasta, flour, pancake mix, nuts, brown sugar, etc. The rubber gasket keeps everything out and I have never had bugs infiltrate any food item stored in these.
 Old School Potato Masher
What it is: A readily available and extremely cheap potato masher.
Why it works: Aside from the obvious potato mashing when you don't have an electric mixer on board or don't want to use the inverter, this tool is great for mashing up the butter and sugars in cookie dough. There are two kinds, those with the s-turn bars and those like this one with the plate design. The ones with the s-turn bars are also good for retrieving lost halyards.
 Digital Laser Infrared Thermometer
What it is: A fairly inexpensive, digital readout, infrared thermometer designed to test the temperature of engines and other miscellaneous heat-producing machinery.
Why it works: This thermometer gets used on our boat a ton. It gets used to read the temperature of the engine, but it gets used much more as a check-the-liquid-ingredients-for-bread-making tool. It's precise, and I have never had a yeast dough fail due to excessively hot or cold temps since I started using it. Also works great to check the temperature of the oven.
 Large Pressure Cooker
(But not why you think)
What it is: A six quart Presto Pressure cooker, circa 1975
Why it works: Yes, I do use my pressure cooker to actually cook the things in it you're supposed to - meat, stews, etc. But the primary use of our pressure cooker is two-fold. First, we make really terrific popcorn in it. It holds a big batch, doesn't burn it because the bottom is so heavy, and if you leave the rocker off the top it vents the steam nicely without letting the kernels fly all over the galley. Second, I use it to raise bread. If you put the lid on but not the rocker and set it in the dodger in the sun, it raises the bread dough beautifully and very quickly. Just oil the cooker a bit before putting your dough in there. One of the chief reasons for yeast dough failure is the rising dough sitting in a draft and, seriously, where is there not a draft on a sailboat???? I even use this method when we're up north in colder weather and the sun sufficiently warms the pot to raise the bread even if the air temperature is cool. I haven't tried this method to make yogurt yet, but I believe it's going to be about the correct temperature for that as well.
So that's my list, and while it's not completely inclusive, it does get my absolute tools that I can't do without. How does your list look?

What it is: A very small silicone spatula that has very fine, sharp edges and a square shape to the bottom with a bamboo handle. It came as one o a set of three. The other two I rarely use, but this one doesn't seem to ever be offered by itself.
Why it works: This spatula is only 1-3/8" x 2" so it's small enough to fit inside most of the small jars that I use on the boat. The super fine, sharp edges completely clean whatever I'm using it on which means that I'm not washing the remnants of whatever jar, skillet, plate, bowl, or leftover container down the drain where they will clog the hose. It has lasted me for four years with multiple times each day use. You can see in the picture that the edges are now starting to chip a bit, but this is not reflection on the quality of the product, only on the extent of use.

What it is: Mine is a 70-year old ice pick handed down to me from my dad. I have no idea where it came from, only that it has served well and is one of the most valuable tools in my galley
Why it works: The key to choosing a usable ice pick is to look for one with the pick securely attached to the handle. Most of the cheaper ones will separate rather quickly. You can sometimes find the ones that the pick and handle are all one piece of stainless. I can't recommend any specific one currently available as I have never had to buy one. We use ours for ice, naturally, but it also comes in handy for poking cakes that you're pouring sauces onto (think Tres Leches Cake), for tenderizing meat (wash carefully after), for aligning screw holes, and would come in handy as a defense mechanism in the event that your boat was boarded by undesirables.

What it is: A set of nesting, silicone prep bowls that measure 1/4 cup, 1/3 cup, 1/2 cup, and 1 cup.
Why it works: This set of silicone bowls is one of those I wish I had bought several of. We use them for everything. They measure and have pinchable areas on one side that form a sharp pouring spout. They also make great small bowls for serving dips and appetizers, or for olives or nuts, or just about anything else you can think of. They wash up beautifully, are easy to store, and don't rust. They no longer offer this color scheme, but the bowls seem to be the same.

What it is: My coffee pot is a very old 50s vintage aluminum pot that I inherited from my dad. It has a base with handle, a nesting filter basket, a water container that sits on top and the lid. It makes 4 cups of coffee or 2 large mugs.
Why it works: This pot makes perfect coffee. You boil the water in a tea kettle and pour it into the water container that you stack on top of the filter basket that you stack on top of the base. The water filters through the coffee in the filter basket and then you remove the water container and filter basket and replace the lid on the base. I know there is a tremendous popularity of the French press coffee makers, but I hate cleaning them on the boat because it's difficult to keep the grounds out of the drain and uses a lot of water to clean. This filter basket accepts a standard coffee filter which is easy to toss when you're done. You can still buy these on eBay and other vintage outlets.

What it is: A 1-4 cup coffee maker that easily collapses and stores on a boat.
Why it works: If we're only making a single cup or mug of coffee, this is our go-to coffee maker. It sits on top of the cup and accepts a cone coffee filter. You pour hot water directly on the grounds in the filter and allow it to soak down into the cup. It takes very little time to make, cleans up easily, and stows in a very small space.

What it is: Parchment paper, if you've never used it before, is a super slippery non-stick paper that allows you to cook without burning or sticking.
Why it works: I simply can't cook on a boat without this stuff. I use it under all of my cookies which allows me to slide the paper off the cookie sheet (I only have one on the boat) and get the next batch going in the oven. I also use it under pizza and place it directly on my baking stones in my oven. I line loaf pans with it when I make banana bread, and roll dough out on it on my counter. It's absolutely essential in boat ovens which are known to have uneven heat. It helps to protect the bottoms of cookies and biscuits and any other baked good from sticking or burning. You can get the Reynolds brand in just about any grocery store, but Big Lots has a brown version that is a fraction of the price. Even most dollar stores carry it.

What they are: These two examples are very small, but I have many versions on the boat, many of them much larger. Any brand of waterproof, locking-lid container is fine but I use these two very small ones the most. The round one is about 3" and holds 1/2 cup and the rectangle one is about 3x5 and holds 1 cup.


What it is: A readily available and extremely cheap potato masher.
Why it works: Aside from the obvious potato mashing when you don't have an electric mixer on board or don't want to use the inverter, this tool is great for mashing up the butter and sugars in cookie dough. There are two kinds, those with the s-turn bars and those like this one with the plate design. The ones with the s-turn bars are also good for retrieving lost halyards.
 Digital Laser Infrared Thermometer
What it is: A fairly inexpensive, digital readout, infrared thermometer designed to test the temperature of engines and other miscellaneous heat-producing machinery.
Why it works: This thermometer gets used on our boat a ton. It gets used to read the temperature of the engine, but it gets used much more as a check-the-liquid-ingredients-for-bread-making tool. It's precise, and I have never had a yeast dough fail due to excessively hot or cold temps since I started using it. Also works great to check the temperature of the oven.
 Large Pressure Cooker
 (But not why you think)
What it is: A six quart Presto Pressure cooker, circa 1975
Why it works: Yes, I do use my pressure cooker to actually cook the things in it you're supposed to - meat, stews, etc. But the primary use of our pressure cooker is two-fold. First, we make really terrific popcorn in it. It holds a big batch, doesn't burn it because the bottom is so heavy, and if you leave the rocker off the top it vents the steam nicely without letting the kernels fly all over the galley. Second, I use it to raise bread. If you put the lid on but not the rocker and set it in the dodger in the sun, it raises the bread dough beautifully and very quickly. Just oil the cooker a bit before putting your dough in there. One of the chief reasons for yeast dough failure is the rising dough sitting in a draft and, seriously, where is there not a draft on a sailboat???? I even use this method when we're up north in colder weather and the sun sufficiently warms the pot to raise the bread even if the air temperature is cool. I haven't tried this method to make yogurt yet, but I believe it's going to be about the correct temperature for that as well.
So that's my list, and while it's not completely inclusive, it does get my absolute tools that I can't do without. How does your list look?
Friday, July 24, 2015
Beer Box
Ed note: updated 3-23-18. See note.
After posting the Beer Tubes post, a couple readers asked if I had attempted something similar for bottles, so here we go.
The bottle box was a much more complicated affair. First of all, what size do you make it, because there are so many beer bottles out there in different sizes? I modeled our box to fit a Killian's Irish Red which is the same height as a Yuengling. If your favorite beer is shorter or fatter, you may need to use a different size dryer duct. Second of all, bottles are too tall to efficiently store them upright so the only conclusion was to lay them on their sides and roll them up. Good in theory, tougher in practice.
I used the same 4" dryer duct tubes to form the box. It requires three of them, and they need to be laid flat out and the corrugated end cut off. One piece will form the front of the box, the width of the panel is almost exactly the length of a long-neck beer bottle, and the other two will be bent to form the sides and back. Here's the specific directions. (I apologize in advance for some of the blurry pics. The macro setting on my camera seems to have gone on the fritz).


Flatten out the first tube. Measure the depth of your fridge that you want the box to be. Cut on that line. Cut all three panels in the same way.
Choose the panel that will be the front of your box. Slide one of the other two panels into the locking grooves.

 Bend that panel at right angles using first your hands and then a ball peen hammer to sharpen up the corner. Remove that panel and repeat with the other side panel.

 Mark each panel because you will be taking them off and putting them back on during the test fit process.
 At this point yo should have something that looks like this.
 Measure for the next fold. This measurement will be the diameter of your beer bottle plus a smidge. You need to allow room for the straps to move as well as the bottle to roll without hinderance.
 Use a table edge or a yardstick to form the next bend, using hands first for the rough bend and then the hammer again for the crisp edge.
 This should be what you have next.
 This is a closeup of what the corner should look like where you slide the two pieces together.

 At this point you should have something like this.
 Tape the loose edges together with painter's tape, just to temporarily hold them together. Measure the width and match it exactly to the width of the front piece so the box is square.
 At this point you should be able to see the two locking channels available to you. Well, at least hopefully you can see better than this blurry pic. The channel you will use to join the back is the one on the top in this picture.
 This is the correct channel to use. the panel to the left in this picture will be cut so that it fits into the groove on the panel to the right of the picture. Mark the left hand panel with a Sharpie and cut it. Be sure to cut carefully and in a perfectly straight line so that it fits into the groove on the right panel.
 Slide the one back panel into the locking channel on the other back panel and tape it with Gorilla Tape. As with the Beer Tubes, don't skimp on this. Regular duct tape will succumb to the moisture always present in boat fridges.
Tape all of the joints at the locking channels with Gorilla Tape.
 Cut two pieces of ribbon or webbing that are at least 1" wide, and 2-1/2 times the length of the box. Lay them as pictured and run a length of Gorilla Tape over them from side to side.
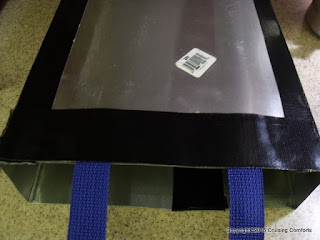
 Run the webbing down into the box, across the bottom and back up the other side. Use one of your patiently waiting beer bottles to hold the webbing down.
Cut a piece of dowel rod the width of the box. Cut the webbing so that it is long enough to go around the rod and have an inch and a half to tape to itself.
 I found the box was not stiff enough so I had to add a piece of 1/4x1-1/2 trim to the front edge to stiffen it up. I just taped it on and taped around the edge.

Lay your bottles in like this. I alternated mine facing every other direction and they seem to roll a bit better.
After posting the Beer Tubes post, a couple readers asked if I had attempted something similar for bottles, so here we go.
The bottle box was a much more complicated affair. First of all, what size do you make it, because there are so many beer bottles out there in different sizes? I modeled our box to fit a Killian's Irish Red which is the same height as a Yuengling. If your favorite beer is shorter or fatter, you may need to use a different size dryer duct. Second of all, bottles are too tall to efficiently store them upright so the only conclusion was to lay them on their sides and roll them up. Good in theory, tougher in practice.
I used the same 4" dryer duct tubes to form the box. It requires three of them, and they need to be laid flat out and the corrugated end cut off. One piece will form the front of the box, the width of the panel is almost exactly the length of a long-neck beer bottle, and the other two will be bent to form the sides and back. Here's the specific directions. (I apologize in advance for some of the blurry pics. The macro setting on my camera seems to have gone on the fritz).


Flatten out the first tube. Measure the depth of your fridge that you want the box to be. Cut on that line. Cut all three panels in the same way.
Choose the panel that will be the front of your box. Slide one of the other two panels into the locking grooves.


Tape all of the joints at the locking channels with Gorilla Tape.


Cut a piece of dowel rod the width of the box. Cut the webbing so that it is long enough to go around the rod and have an inch and a half to tape to itself.


Lay your bottles in like this. I alternated mine facing every other direction and they seem to roll a bit better.
Here's the video demonstration. It's completely functional, but not near as elegant as the Beer Tubes. But hey, at least you can get a beer without removing everything else from the fridge. The energy savings alone should pay for a six pack before long. Enjoy!
Note: I have since changed the design a little. I removed the straps and added a piece of Phifertex. I taped it along the top edge, made it long enough to go to the bottom and back up the other side and rolled out around a piece of wooden dowel to use as a handle. The bottles tended to fall out of the straps and the Phifertex makes a nice cradle for them to sit in.
Note: I have since changed the design a little. I removed the straps and added a piece of Phifertex. I taped it along the top edge, made it long enough to go to the bottom and back up the other side and rolled out around a piece of wooden dowel to use as a handle. The bottles tended to fall out of the straps and the Phifertex makes a nice cradle for them to sit in.
Tuesday, July 14, 2015
Beer Tubes
(Ed note: updated 8-8-16 - see end note)
One of the most frustrating things about living on a boat (especially for my husband) is dealing with a top-loading refrigerator. Every once in awhile you'll even see the cartoons about someone falling in while trying to reach something on the bottom.
For my husband, the big frustration was in getting a can of Coke or beer out. They always seem to migrate to the bottom of the fridge and getting one involved removing almost everything. We tried various racks designed for regular upright fridges but they just didn't work. After seeing that a good friend of ours had the same issue with his fridge, I decided to create a solution.
I once had a friend that stored his grill propane tanks in a piece of PVC pipe attached to his bimini rail. It had a slot in the side so he could push the tanks up and out the top as he needed them. I thought something similar might work in the fridge, only the slot idea wasn't going to fly because the fridge is usually packed and it would be impossible to access it. I then began to think about using a ribbon or piece of webbing to lift out the cans. Several trips to the hardware stores changed the plan as the smallest diameter PVC tube is 3" and it's just a bit too big for the cans and takes unnecessary space in the fridge. The wall thickness was too big also, which would mean longer cooling times for the cans.
I spent an hour just walking around Lowes looking at stuff and happened on the aluminum dryer duct pieces - the ones that come in a flat sheet and you curve them into a tube and lock the edges together (not the flexible hoses). The smallest one they had was 4" diameter, but I figured I could cut it down and it would work fine. I did, and it did. So here's the directions:
Materials required
1 piece of 4" dryer aluminum dryer duct extension for each tube. Mine was a 2' section
1 piece of heavy grosgrain ribbon or webbing that is 2-1/2 times the length of your finished tube
Gorilla tape - don't skimp on this.
Good pair of tin snips

If you're using the 4" duct extension, examine the locking mechanism so you cut off the right edge. You need the slot edge to remain because once you cut off the other side, you will insert the cut edge in to the slot before you tape it so that fingers and the cans won't get cut on the sharp edge.

Once you determine which edge to cut, mark 3-3/4" from the edge in several places with a permanent marker and draw a line to cut. This aluminum is very sharp so watch your fingers. Cut very carefully because you need a perfectly straight edge to insert into the slot.

Carefully wrap the sheet into a cylinder shape and working from one end to the other, insert the cut edge into the slot on the other edge. It takes some wiggling to get it to go in the whole length.


Cut a piece of Gorilla tape the length of the tube and place it evenly over the seam.
Cut the tube to the length that will fit in your fridge, allowing about 1/2 of space between the top of the tube and the underside of your fridge lid.
File or sand the top and bottom edges of the tube to remove any burrs.


Lay your ribbon or webbing about 2" from the top of the tube and tape all the way around the tube top, fastening the webbing under the tape.


Run the webbing over the edge, down in to the tube and up over the opposite edge making a dip in the webbing. Place a beverage can on the webbing and continue to lower the can into the tube, adding more cans as you go.
Some miscellaneous notes:
I fastened my tubes to a wood divider that we have in our fridge so they wouldn't topple over if the fridge was not full. I did that with another piece of webbing that I screwed into the wood, around the tubes, and back into the wood.
Also, I did notice through trial and error, that it appears you can't fasten the webbing onto the tube directly over the seam. For some reason it changes the shape of the tube when you pull and makes the cans stick. Fasten the webbing 1/4 way around from the seam.
We have styrofoam board on the bottom of our fridge on top of a teak grate for insulation, and I actually "screwed" the tube into the foam a bit to hold it in place.
If you have any other ideas for modification or improvement, leave them in the comments!
Update 8-8-2016
After using these now for over a year, a few issues have come to light. Were I to make new ones, I would make them just slightly larger. As the tubes wear, the top edges bend a bit making it harder to slide the cans out, making the webbing strap push off to one side or the other. I might also consider using the PVC the next time. All in all, these tubes have been a lifesaver on our boat!
One of the most frustrating things about living on a boat (especially for my husband) is dealing with a top-loading refrigerator. Every once in awhile you'll even see the cartoons about someone falling in while trying to reach something on the bottom.
For my husband, the big frustration was in getting a can of Coke or beer out. They always seem to migrate to the bottom of the fridge and getting one involved removing almost everything. We tried various racks designed for regular upright fridges but they just didn't work. After seeing that a good friend of ours had the same issue with his fridge, I decided to create a solution.
I once had a friend that stored his grill propane tanks in a piece of PVC pipe attached to his bimini rail. It had a slot in the side so he could push the tanks up and out the top as he needed them. I thought something similar might work in the fridge, only the slot idea wasn't going to fly because the fridge is usually packed and it would be impossible to access it. I then began to think about using a ribbon or piece of webbing to lift out the cans. Several trips to the hardware stores changed the plan as the smallest diameter PVC tube is 3" and it's just a bit too big for the cans and takes unnecessary space in the fridge. The wall thickness was too big also, which would mean longer cooling times for the cans.
I spent an hour just walking around Lowes looking at stuff and happened on the aluminum dryer duct pieces - the ones that come in a flat sheet and you curve them into a tube and lock the edges together (not the flexible hoses). The smallest one they had was 4" diameter, but I figured I could cut it down and it would work fine. I did, and it did. So here's the directions:
Materials required
1 piece of 4" dryer aluminum dryer duct extension for each tube. Mine was a 2' section
1 piece of heavy grosgrain ribbon or webbing that is 2-1/2 times the length of your finished tube
Gorilla tape - don't skimp on this.
Good pair of tin snips

If you're using the 4" duct extension, examine the locking mechanism so you cut off the right edge. You need the slot edge to remain because once you cut off the other side, you will insert the cut edge in to the slot before you tape it so that fingers and the cans won't get cut on the sharp edge.

Once you determine which edge to cut, mark 3-3/4" from the edge in several places with a permanent marker and draw a line to cut. This aluminum is very sharp so watch your fingers. Cut very carefully because you need a perfectly straight edge to insert into the slot.

Carefully wrap the sheet into a cylinder shape and working from one end to the other, insert the cut edge into the slot on the other edge. It takes some wiggling to get it to go in the whole length.


Cut a piece of Gorilla tape the length of the tube and place it evenly over the seam.
Cut the tube to the length that will fit in your fridge, allowing about 1/2 of space between the top of the tube and the underside of your fridge lid.
File or sand the top and bottom edges of the tube to remove any burrs.


Lay your ribbon or webbing about 2" from the top of the tube and tape all the way around the tube top, fastening the webbing under the tape.


Run the webbing over the edge, down in to the tube and up over the opposite edge making a dip in the webbing. Place a beverage can on the webbing and continue to lower the can into the tube, adding more cans as you go.
Here's the video of the final product in action:
Some miscellaneous notes:
I fastened my tubes to a wood divider that we have in our fridge so they wouldn't topple over if the fridge was not full. I did that with another piece of webbing that I screwed into the wood, around the tubes, and back into the wood.
Also, I did notice through trial and error, that it appears you can't fasten the webbing onto the tube directly over the seam. For some reason it changes the shape of the tube when you pull and makes the cans stick. Fasten the webbing 1/4 way around from the seam.
We have styrofoam board on the bottom of our fridge on top of a teak grate for insulation, and I actually "screwed" the tube into the foam a bit to hold it in place.
If you have any other ideas for modification or improvement, leave them in the comments!
Update 8-8-2016
After using these now for over a year, a few issues have come to light. Were I to make new ones, I would make them just slightly larger. As the tubes wear, the top edges bend a bit making it harder to slide the cans out, making the webbing strap push off to one side or the other. I might also consider using the PVC the next time. All in all, these tubes have been a lifesaver on our boat!
Saturday, November 15, 2014
The Science of the Chocolate Chip Cookie from NPR's The Salt
One of the commitments that I've made on this blog is to provide recipes that are easily adaptable to whatever ingredients you have on hand. I do this because when you're living on a boat sometimes you just don't have the exact ingredients stated in a recipe and you need to substitute. Cookies are a great way to experiment with this idea while you learn what works and what doesn't because they're pretty forgiving. I ran across an article today on The Salt blog that explained exactly what happens when you substitute ingredients. I found it incredibly helpful since I'm a visual person so go on over to the page The Science Behind Baking Your Ideal Chocolate Chip Cookie and then go ahead and make some perfect deliciousness!
 | |
| See the full instructions on The Salt Blog, www.npr.org/blogs/thesalt |
Subscribe to:
Posts (Atom)