Saturday, November 15, 2014

The Science of the Chocolate Chip Cookie from NPR's The Salt

One of the commitments that I've made on this blog is to provide recipes that are easily adaptable to whatever ingredients you have on hand. I do this because when you're living on a boat sometimes you just don't have the exact ingredients stated in a recipe and you need to substitute. Cookies are a great way to experiment with this idea while you learn what works and what doesn't because they're pretty forgiving. I ran across an article today on The Salt blog that explained exactly what happens when you substitute ingredients. I found it incredibly helpful since I'm a visual person so go on over to the page The Science Behind Baking Your Ideal Chocolate Chip Cookie and then go ahead and make some perfect deliciousness!

The Science Behind Baking Your Ideal Chocolate Chip Cookie
See the full instructions on The Salt Blog, www.npr.org/blogs/thesalt

Friday, October 31, 2014

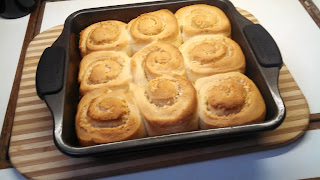
Orange Coconut Rolls

There's something about warm breakfast rolls straight from the oven. They give me those warm, fuzzy comfort feelings, probably because they take me back to mornings with my kids when they were smaller and life was not so complicated. These rolls came about because some coconuts floated by our boat at anchor and I spent an afternoon cleaning them, grating the coconut, and toasting it. The next morning I just happened to have an extra orange in the fruit basket, so orange coconut rolls it was. The recipe is out of the Red Star Yeast Centennial Bread Sampler cookbook, probably my favorite, but it's out of print. If you even find one and you like bread you should pick it up.


Ingredients

2-1/4 to2-1/2 cups all-purpose or bread flour
1 package of instant yeast
3 Tbl sugar
2 tsp freshly grated orange rind
1/2 tsp salt
1/2 cup milk
1/4 cup water
3 Tbl butter
1 small egg

Topping:
3/4 cup sugar
3 Tbl butter
2 Tbl freshly squeezed orange juice
1 Tbl honey
1/2 cup coconut, divided
1/4 cup sliced almonds

Directions:

I don't have pictures for these earlier steps, honestly because some times I get making things and then realize, oh yeah I should be posting this one. You can read basic dough directions and see pictures in my Vienna Snack Loaves post if you need help.

In a large mixer bowl, mix one cup of the flour, the yeast, sugar, orange rind and salt. Mix it well.

In a saucepan heat up the milk, water and butter until it's 120°.  I use one of those infrared thermometers to measure the temperature because it's pretty critical. You can easily kill yeast if your liquids are too hot.

Add the liquids to the flour/yeast mixture and blend it at low speed by mixer or by hand until all the flour is incorporated. Add the egg and beat it for 3 minutes, either by hand or by mixer

Gradually add enough of the rest of the flour to make a soft but not sticky dough. If you're making this on a boat, the amount of flour can vary widely depending on the humidity. The dough should not be sticky.
Knead the dough on a floured surface until it's smooth and elastic, about 5-8 minutes. Cover it with plastic wrap and let it rest for 10 minutes.

While you're letting it rest, make the topping. Combine the sugar, butter, juice and honey and heat it until it's blended and the sugar is dissolved. Reserve 3 tablespoons of it and put the rest of it in a greased 9-inch square pan. Sprinkle half of the coconut and the almonds over the topping. Keep the remaining sauce warm.

After the dough has rested, pat it out into a 12 x 9 inch rectangle. Brush it with the remaining warm sauce and sprinkle the remaining coconut over it.

Roll it up long side first, pinching it down in the crease with your fingers.


Pinch the edge to the main roll to seal it.


Using some dental floss or sewing thread wrapped around the loaf, cut slices from the roll. This recipe makes 9 large rolls and it helps to mark the slice points in the dough before you begin cutting.
The dental floss or thread makes nice cuts. If you try to cut it with a knife it will crush the loaf and you won't have nice, round rolls.

Arrange the rolls evenly in the pan on top of the topping mix.

Cover loosely with a towel and let them raise till almost doubled, about 30 minutes. It can take less or more depending on the temperature and humidity of your raising environment. Keep them away from drafts! A draft will make them fall. I usually set them on my stove while I preheat the oven.


Bake them at 400° for 15-20 minutes. Again, if you're doing this on a boat the times can vary widely due to different ovens.


Cover them immediately with foil and invert them onto a rack. Do not let them cool first as the topping will stick to the pan and not to the rolls. I have added a powdered sugar glaze here although it's not in the original recipe. You can make some with a 1/2 cup of powdered sugar and just a few drops of milk. Drizzle it over and serve warm.

Friday, October 3, 2014

Lazy Morning Loaded Fried Potatoes and Eggs

Some mornings on a boat are better than others. There's the mornings where you're woken up by rain on your face through the V-berth hatch that find you scrambling to close all the ports before your laptop is soaked. Then there's the mornings you nearly get dumped out of the same V-berth by the Sunday morning jet-skiis careening around your hull. The mornings that you wish for when you begin your cruising dreams are the mornings where it's just cool enough to enjoy your coffee in the cockpit, and you have the time to fix a really great lazy breakfast. As a disclaimer, please remember that the name of this blog is Crusing Comforts, aka comfort food, and not about necessarily healthy eating...

Ingredients:

1 large Idaho potato or several small red potatoes
1-2 Tbl Butter
1 Tbl olive oil
1 tsp chopped garlic or 1-2 cloves smashed fresh  garlic
1/4-1/2 medium onion sliced thin
1/2-1 cup grated sharp cheddar
Crumbled leftover bacon (see the previous post on thinking ahead) or Bacon Bits
4 eggs
Jane's Crazy Mixed-up Salt

Directions:


Wash the potatoes well and pat dry with a paper towel. Slice them into 1/8" slices or 1/4" if you like them a little thicker. Heat a large cast iron skillet to high. Add the oil and butter. Add the garlic, onion, potatoes, and a liberal amount of Jane's Crazy Mixed-up Salt. (I talk about this salt all the time on this blog because I absolutely love it. If you try it and love it too, buy a couple containers for the boat because it doesn't last long! I've also heard they have a mixed-up pepper but I have yet to try it.)


Depending on the strength of your burners, you may have to reduce the heat to medium. You will need to stir the potatoes periodically, but don't handle them too much as they will break up into mush. Let them brown on the bottom, then flip them around and let them brown again.


When your potatoes are close to being done, just barely tender, heat a small non-stick skillet and fry your eggs to your personal preference. We're usually over-easy people, or I add a lid to sunny-side, turn the heat off, and steam the top.

While your eggs are cooking, add the cheddar and bacon to your potatoes and put a lid over them. Turn the heat off and let them sit to melt the cheese.

Serve with a dolop of sour cream if you want, a big glass of orange juice or some fresh strawberries and enjoy your lazy morning!


Sweet Potato Chips

If you can't remember what snack food has the tag line, "betcha can't eat just one", you can probably stop reading now. These are the most delectable, addicting, snack foods on the whole earth. They are time consuming, but not hard to do, and they will impress your sundowner crowd to no end.  Just don't come back to me complaining about the few extra pounds you're carrying! Here are the ingredients, simple as they can be. If you're worried about using a lot of oil for frying, I keep mine in a jar and reuse it over and over again. Just filter it through a coffee filter when it's still a bit warm and then refrigerate it to keep it fresh. You can get at least 4-6 uses out of it before you have to throw it out. Use a smaller pan if you want to use less oil, and do more batches. If you use a low-smoking oil like peanut oil then you won't smoke up the inside of the boat.


Ingredients:

3-4 medium sweet potatoes, not peeled
cinnamon sugar for a sweet snack or
Sweet and smokey spice mix for savory
Enough peanut oil to fry in a 10" skillet, 3-5 cups.

Directions:

Wash the sweet potatoes well, scrubbing with a brush. Slice them thinly. You can use a mandolin if you have one, but I just use my potato peeler which is a very good, sharp one. A good, sharp knife will do the trick as well if you're patient.

Heat your oil to 350°. As I've mentioned before, I use a Harbor Freight infrared thermometer to check oil temp as well as most other temps in my galley like bread liquids and pizza pan temp. You may have to adjust your oil temp as you work your batches as different oils and different pans and different stoves react, well, differently.

Lower enough chips into the oil with a slotted spoon to cover the surface in a single layer. Cook them until they begin to brown but be careful because once they start to brown, they go from golden to burnt in seconds. Remove them to a cookie sheet lined with paper towels and season them before they cool. Serve immediately. These do not keep well, and will begin to soften within hours due to the high humidity environment of a boat, so enjoy them right away.

Thinking ahead

One of the most difficult things to do on a boat is to deal with meal planning. Unless you live on a dock and have a car, you can rarely dash to the store for some forgotten ingredient. The other issue is the lack of ability to keep leftovers fresh for any length of time, since refrigeration is usually inefficient at best.

One way to help with this challenge is to buy meals that you can double up on by changing or adding a very few ingredients. As an example, last night we had cheese tortellini with a red sauce, French bread, and a salad. I made twice the tortellini that we could eat, and put the rest in the fridge. This afternoon I took the rest of the tortellini and added chopped red pepper, red onion, chopped cucumber, julienned carrots, and grated Parmesan. I made a simple shake together vinaigrette with olive oil, vinegar, garlic salt, oregano, and lemon pepper and tossed it into the tortellini. I served it with leftover bread and a few slices of red pear. I didn't have to heat up the galley twice to prepare two meals and I had no leftovers.


Some other ways to double up on a meal:

Pork chops the first night with rice, pork fried rice with the leftovers.

Meatloaf the first night, cold meatloaf sandwiches the second.

Grilled chicken the first night, greens with thinly sliced cold chicken, mandarin oranges, toasted almonds, and balsamic vinaigrette the next.

Ham, grilled pineapple, and broccoli the first night, cheese omelets with diced ham and chopped broccoli the next.

Fried chicken tenders the first night, greens with diced fried chicken, cheddar chunks, red pepper chunks, and tomatoes the next day.

Grilled fish fillets with oven roasted red new potatoes and corn the first night, fish corn chowder with the leftover potatoes and corn and add onion and celery and cream the next.

Tacos the first night, then chili with the leftover taco meat as the base- add beans and canned tomatoes. Or use the taco meat for the base for sloppy joes. Doctor with barbecue sauce and spoon on crusty rolls.

Fish tenders and tossed salad the first night, fish tacos with the leftovers.

Roast chicken, baked potatoes and corn on the cob the first night, chicken corn chowder with the cold baked potatoes diced in and the corn and added cream the next.

Roast chicken or baked ham the first night, a chef salad the second.

I could go on and on with this, but if you have your favorites please comment below!


Friday, September 19, 2014

Mocha Frappe

Ever since we arrived in Ft. Lauderdale early in the summer, it has been too hot to have our morning coffee in the cockpit. At some point during our stay here we happened to be running errands and we stopped in at McDonalds <ugh> to order one of their McCafe mocha frappes. It was, undeniably, delicious. After enjoying a few sips I told my husband, "I think we could make these on the boat, you know." It took a few tries to get the proportions just right, but we have a winner and now we don't start the day without one. I'm sure it will get cool enough to enjoy our coffee in the cockpit soon, but for now we're ok with the heat...as long as we start out the day with our mocha frappe.


Ingredients:

Ice
Instant expresso
Hershey syrup
1/2 and 1/2
(optional whipped cream)

Directions:

We use the Magic Bullet, but any blender capable of crushing ice will work. I have never found any 12v blender really capable of making a frappe, so we use our generator when on the hook.  If you've found a 12v blender that is honestly capable to crush ice and costs less than season tickets for the opera, please leave a comment as I'm sure someone might be interested. I got my Magic Bullet on sale at Costco for $39.95 and it comes with a bunch of cups, a variety of lids for the cups, a nearly full-size blender container, and three blending blades that fit on either the cups or the blending container. It makes great chicken or ham salad, blends butternut squash soup, chops nuts, and makes a killer frozen margarita. I'm sold.

The ingredient quantities are very subjective on this recipe. You'll have to experiment with your blender and cups till you get what works for you. In the meantime, enjoy your experiments!  The cups I use are 16 oz and I start by filling them almost 2/3 full of ice. Then I take 2 heaping teaspoons of instant expresso (regular for my husband, decaf for me) and mix about 1/3 cup of water into it to dissolve it. I pour this over the ice. I then squirt (I kid you not) about 4 seconds of Hershey syrup into the cup - don't worry I measured it this time and it comes to about 1/4 cup. I add enough 1/2 and 1/2 to cover the ice, put the lid on and pulse it on the Magic Blender until the big chunks of ice are broken up completely. Then I run it full out for 10 seconds, let it rest for about 30 seconds so any missed chunks fall to the bottom, then run it for 10 more seconds. Add a little whipped cream (didn't have any this time) and a couple drizzles of chocolate sauce and then close your eyes and savor it. It won't last long, I assure you!


Fill a 16 oz cup about 2/3 full of ice.
Mix 2 heaping teaspoons of instant expresso with about 1/3 cup of water and stir till dissolved.

Pour the coffee over the ice. Add about 1/4 cup of chocolate syrup.


Pour enough 1/2 and 1/2 to cover the ice.


Pulse it till the ice is chopped up fairly fine, then blend it on high for 10 seconds. Let it rest for 30 seconds and blend again for 10 seconds. Add a little whipped cream and enjoy!

Thursday, July 17, 2014

No-oven skillet pizza

Edited 11-24-14: I have worked on this recipe some more because we use it constantly. Here are some improvements. If you like thicker crust pizza then you need to turn down the heat a bit. I have also been pressing out the dough on a piece of parchment paper and transferring the whole parchment paper onto the skillet. This keeps the bottom from getting too dark. When I do the flip, I remove the paper. Enjoy!
 
Before you discount this recipe just based on the title and what your personal pizza prejudices are, I dare you to try it. Honestly, I may never make pizza in the oven again. This was that good.  I started out by Googling "stove top pizza" because my galley oven is broken and we have yet to find the pieces to fix it. I ended up on the Pizza Lab's site and starting out with his idea I began to modify things for my own taste. Give it a shot and I promise you won't be disappointed!

Ingredients:

Pizza Dough Recipe: The recipe at this link is for 3 pretty large pizzas in the 14" range, depending on how thin you make it. I made 3/4 of this recipe and divided the raised dough in 4 balls and made 4 pizzas the size of the bottom of my cast iron skillet. It's really important to start out with a good dough recipe and this is the best one I've ever used.

Pizza sauce, small jar
Mozzarella or pizza 4-cheese mix grated, 8 oz
Pepperoni or whatever other toppings you like.


Directions:

Make the dough per the recipe. After it rises, divide it into 4 or 5 balls and set them aside. You need the heaviest skillet you have and I have found that cast iron works the best. Heat the skillet to 500°. This is very important. Check it with a digital thermometer - the laser type that we keep on the boat to check the engine temp is what I use. If the temp isn't evenly 500° over the skillet bottom, turn the pan until it's fairly even. The way that my burners are set up on my galley stove, the skillet can't quite get over the middle of the flame without bumping into the rails around the stove top so I have to turn mine frequently. When the skillet is almost ready, press one of the balls into a circle a little larger than the bottom of your skillet. The dough will shrink back as soon as it settles in the pan so you need to make it slightly larger than that diameter.

While you are waiting for the skillet to heat, heat up your sauce and toppings. If you're using veggies, saute them and keep them warm. If you're using pepperoni, toss it in a small skillet and heat it up till it just starts to crisp. Keep the toppings warm.


Once the skillet is hot, place it on a heat diffuser. Oil the skillet with olive oil and gently lower the circle of dough onto the skillet. Turn the skillet periodically to even the heat. Check the bottom of the crust with a spatula. It should take several minutes for the crust to  become golden brown and for bubbles to appear in the dough on the top.


Brush the top with olive oil and flip it over. Cook it for a few minutes until the places touching the skillet become golden brown and the remainder is no longer doughy.


Flip it back over, spread with your sauce, cheese, and toppings. Immediately turn the burner down to low and cover the skillet with foil or a lid that has a vent hole in it.


Let it cook a few more minutes until the cheese melts and the bottom is crispy but not burned. This recipe makes fantastic crispy crust, chewy inside pizza that is as good as any pizza shop!