Friday, July 20, 2012

Cheese Stuffed Mushrooms

I used to make some stuffed mushrooms once upon a time that had crab in them. That was before my captain developed a late-in-life rather severe allergy to shellfish (I know, I know...shellfish allergy when you're planning on being a full-time cruiser...). A good friend of ours at the marina was kind enough to pass on his recipe for cheese stuffed mushrooms and they've been a tremendous substitution for the old crab ones. These can be done in the oven or on the grill. They make a great summer weather side dish for chef salad, our meal for this evening on the boat.

Ingredients:
1 14oz package of mushrooms
8 oz package of Neufchatel cheese
1/3 to 1/2 cup grated parmesan
1/2 to 1-1/2 tsp garlic salt

Directions:
Wipe mushrooms with paper towel dipped in ice water. NOTE: if you wipe them this way they don't get slimy the way they do if you wash them.  Remove stem and put the mushrooms in a cast iron skillet or 8" square pan.


Mix cheese, parmesan and garlic salt in bowl. Divide cheese mixture in mushrooms evenly, putting a heaping teaspoon in each mushroom indentation.


Top with an additional sprinkle of parmesan. Grill till tender and cheese is lightly browned or bake at 400° till tender and cheese is lightly browned, about 20-25 minutes.
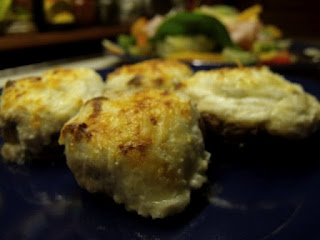


When I do these in my boat oven I need to put them under the broiler the last 5 minutes.

Enjoy!

Recipe courtesy of Kort Juenger, Boulder Marina


Wednesday, July 18, 2012

Silicone bakeware review

I've had a love/hate relationship with the idea of owning silicone bakeware. I've wanted to add it to the boat's galley inventory because it fits in unusually shaped spaces since it's flexible, and because it doesn't corrode in salty air, and because it's easier to fit in smaller galley sinks since it's flexible. The only problem is that every piece of silicone bakeware that I've ever used had one rather annoying disadvantage - they all stuck food to them even though the main advertised feature was the non-stick aspect. So I've bought them and discarded them over the years and ended up with my regular rusting pans on the boat.

Enter HIC Brands that Cook Essentials Silicone 12-Cup Muffin Pan stage left...


This is a truly amazing pan that I bought because of an Amazon review. It appears that the reason most silicone bakeware sticks is that it's not 100% silicone. The HIC Brands that Cook pans are all 100% silicone with no fillers. This was news to me and since I've always had very successful results when basing a purchase on an Amazon review, I went ahead and ordered one. My cupcakes baked beautifully, didn't stick, and the pan washed up like new. I did have to put a regular cookie sheet under it to support it as it's a little more flexible than I was comfortable with in trying to get it in and out of the oven, but you could use a pizza peel to do the same.

I do a lot of baking for some allergy-laden kids on the GAPS diet, and the muffins and cupcakes are moister and have less structure than ones baked with grain so I was concerned that the edges might not crust enough to hold them together. Not to worry. Today I made a batch of White Bean Chocolate Cupcakes for my granddaughter's birthday party and they turned out beautifully. So if you're in the market for a good silicone muffin pan, travel on over to Amazon and then enjoy this delicious bit of chocolaty goodness.

1 can white beans, drained and rinsed (navy,   great northern, etc.
5 Tbl coconut oil
1/2 Cup honey
5 small or 4 large eggs
1 Tbl vanilla
1/2 tsp salt
1 tsp baking soda
1/4 Cup cocoa powder
2 oz melted unsweetened chocolate

Blend all in a blender or use a stick blender until smooth.  Divide evenly into a 12-cup silicone muffin pan. Bake 350° for 25 minutes. If you bake these in a regular metal muffin pan and use regular paper liners a lot of the cupcake will stick to the paper. You can use parchment paper liners but the silicone is the best. Makes 12 moist delicious cupcakes that don't even need icing.


Sunday, June 17, 2012

Homemade Sausage Patties

I recently spent a month with the grandson that has all the severe food allergies (See In Search of Real Food). He absolutely loves sausage but he hasn't been able to have any due to all the nitrates and other preservatives that is so prevalent in commercial sausage. So I perused the internet and came up with a basic recipe which after much tweaking ended up with this one. Keep in mind that sausage varies wildly with the individual's preference so you may prefer yours more spicy or less. Experiment with these. They are great formed into patties and frozen with waxed paper in between them so you can pull just one or two out to cook. Keep the heat lower if cooking frozen ones and cook longer.

Ingredients:


2 pounds of pastured pork, ground
2 teaspoons of ground sage, slightly more if you use leaves rather than powder
1-1/2 tsp salt
1/2 tsp black pepper
1 tsp 5-pepper blend
2 Tbl organic maple syrup or honey


Mix the meat with the spices and syrup. If your  meat is very lean, you may want to add a couple tablespoons of water to the mix. Form into patties keeping in mind that they will shrink about 30%.


Brown quickly on the first side and turn. Reduce heat to medium low and continue to cook until the juices run clear when pierced with a fork.


These are incredibly easy and taste so much better than commerical sausage that I doubt I'll every buy it again. Enjoy!


Pineapple Upside Down Cake

I got this recipe from Smitten Kitchen, a site that a friend of mine turned me onto that has some truly fabulous recipes. I was looking for a pineapple upside down cake that used fresh pineapple rather than the canned version because fresh pineapple seems to be a fruit that cruisers have on their boat frequently and I happen to love it. This recipe is great because it uses a pre-cooked caramel on the top (or bottom if you're making it) and it makes all the difference in the world with the fresh pineapple. Just ask the group of The Assembled here at the marina - the cake is already gone before it even cooled completely.


Topping:


1 medium pineapple, peeled, cored and sliced or use the Pineapple Slicer
3/4 stick of unsalted butter
3/4 cup packed brown sugar


Prepare the pineapple and set aside.


If you have a cast iron skillet, melt the butter and brown sugar in it till bubbly and smooth, about 4 minutes.


Arrange the pineapple slices in the caramel sauce.
If you don't have a skillet, do this in a separate pan and transfer to 9" round baking pan or 8 x 8" pan and arrange the pineapple.


Batter:


1-1/2 cups all purpose flour
2 tsp baking powder
1/4 tsp salt
3/4 stick unsalted butter, softened
1 cup sugar
2 large eggs
1 tsp vanilla
1 Tbl dark rum
1/2 cup unsweetened pineapple juice
2 Tbl dark rum for sprinkling over cake


Mix flour, baking powder and salt together in a bowl with a whisk. Set aside. In another bowl, beat butter and sugar till light and fluffy. I don't have an electric mixer on board so I do everything with a whisk. Don't be intimidated by this. It just takes a little more muscle.


Add eggs, one at a time and beat well. Add vanilla and rum. Mix well.


Add 1/2 of the flour mixture and beat till creamy. It will be thick.


Add the pineapple juice and mix well again. The batter will look slightly curdled at this point. Add the remaining flour mixture and mix well.


Pour over pineapple and caramel and spread gently so as not to disturb the pineapple.


Bake at 350° for 45-50 minutes or till cake tester comes out clean and cake is golden brown. Cool on rack for 5 minutes. Put plate on top of pan or skillet, and holding both together firmly, turn over. Let sit for a minute to allow caramel to drain onto cake.


Lift off pan and scrape any pineapple that stick off and replace to cake. Sprinkle with remaining rum. Allow to cool till just warm and serve with dollops of whipped cream or chill and serve with ice cream.


Mmmmmmmm........


Monday, June 11, 2012

Perfect Iced Coffee

I'm an avid coffee drinker, but because I like my coffee piping hot, in the summer my coffee consumption drops dramatically just because of the heat. A while back my son-in-law got me hooked on iced coffee, a perfect compromise for summers in St. Louis. I'm also including a link to my reviews blog so you can read about the Thermos mug in the picture.  Enjoy!

Iced Coffee

3/4 Cup of coffee grounds, flavor of your choice.
10 Cups of filtered water
16 drops of Stevia extract or sugar or honey of your choice
1 Tbl vanilla extract
Full fat milk or some cream and some milk.
Ice

Brew the coffee and let cool completely. If you like really strong coffee, just put the grounds in the water and bring to boiling on the stove, turn off the heat, and let it steep for a while then just run it through a coffee filter or fine wire mesh basket to remove the grounds. Add the vanilla and Stevia. You can use sugar, but I try to stay away from sugar as much as possible so I use Stevia a lot. 

Pour coffee to about 1/2 or 2/3 of a glass / cup / mug. Add your milk or cream to your liking. Sorry no amounts here because this is totally personal preference. Some like it more creamy, some more coffee. Add ice. Enjoy. I keep the coffee / vanilla / Stevia  mixture in a quart jar in the fridge and add the cream or milk right before drinking. You'll see organic milk in my picture. If you've never had it, I can't stress the difference it makes in this recipe.  Pure delight.

Saturday, May 5, 2012

Quick Cheese Bread

This cheese bread is also from Cooks Illustrated, and while we're on the subject, I'll do a little plug for them here. It is a subscription service, but well worth the price of admission. They have very well-tested recipes, videos for particularly difficult processes, and excellent directions and pictures. At the beginning of each recipe they have a "Why this recipe works" comment with very helpful information.

That being said... my daughter would say I committed culinary travesty on this recipe this time because it calls for freshly grated parmesan cheese and I only had the dried powder type <gasp>. This happens sometimes when you're a cruiser and I will never publish any recipe here that can't be adapted well to what you might have on hand, so here we go (sorry Amber).

Ingredients:


3 ounces parmesan cheese shredded on large holes of box grater (about 1 cup)
3 C. all purpose flour (15 oz)
1 Tbl baking powder
1/4 tsp cayenne pepper (I used a 5 pepper fiery blend I had on        hand)
1 tsp table salt
1/8 tsp ground black pepper
4 ounces extra-sharp cheddar cheese cut into small cubes
   (or mild asiago crumbled into 1 C.)
1-1/4 C. whole milk (or 2% but NOT skim)
3 Tbl unsalted butter, melted
1 large egg beaten lightly
3/4 C. sour cream


Heat oven to 350°. Grease 9x5 loaf pan then sprinkle 1/2 cup of the parmesan in the bottom of your pan.


In a large bowl mix the flour, bakng powder, peppers, and salt with a whisk.


Add the cheese and toss it until it's evenly coated with the flour mixture.


In another bowl, mix the milk, butter, egg and sour cream.


Stir the wet mixture into the dry mixture and blend it together quickly until all the dry ingredients are mixed in. Do not overmix as this will give you a pretty tough bread.


Spread it into the prepared pan and top it with the remaining parmesan. Bake it at 350° for 45-50 minutes. In my boat oven I need to cover the top loosely with foil the last 10 minutes or so because it rises high and starts to burn. I use an ice pick to test for doneness, but a word of caution - move the tester around a couple of times because if you happen to hit a cube of melted cheese it will look like the bread is not done when it might be.


Cool it on a rack in the pan for 5 minutes and then remove it to the rack to cool another 45 minutes. I know, it's not a quick bread in the sense that it's quick till you get to eat it, only quick to mix. If you can't resist the temptation and you cut it too soon, you'll miss the improved texture of the bread after it cools so try to wait if you can.


(I dare you).

Fish Cakes

This is an adapted recipe from Cooks Illustrated, a recipe site that my daughter virtually lives on, and continually passes me recipes from. The original recipe was for Maryland Crab Cakes, but since my husband developed a late-in-life allergy to shellfish, we adapted it to fish. It's a cruiser's delight because you never know what kind of fish or shellfish you're going to catch that day or have sitting in your freezer from previous days.

Ingredients:


2 pounds of lump crabmeat, lobster, or any other fish you might have. 
8 medium scallions, green part only, minced (about 1/2 cup) (see "never-ending green onion")
2 Tbl fresh parsley leaves, cilantro, dill or basil finely chopped
3 tsp Old Bay seasoning
4-8 Tbl dry bread crumbs
1/2 C. mayonnaise
2 large eggs
1/2 C. white or whole wheat flour
1/2 C. oil


Poach shellfish or fish until just cooked through. Drain and place in large bowl. 


Add scallions, cilantro, Old Bay, 4 tablespoons bread crumbs, mayonnaise, and eggs. Mix just until combined, leaving large chunks of fish. 


If the fish is moist and still won't bind, then add additional bread crumbs 1 tablespoon at a time until they will bind. 


Form into cakes and pat with flour till all sides are coated. 


Fry in oil until golden, turn, and fry other side until golden. 


Serve with either tarter sauce or Creamy Chipotle Chile Sauce, below.


Creamy Chipotle Chili Sauce
1/4 C. mayonnaise
1/4 C. sour cream
2 tsp canned chili in adobo sauce (minced)
1 small clove garlic, minced
2 tsp minced fresh cilantro leaves
1 tsp lime juice fresh from lime


Blend all ingredients together well and chill to blend flavors.